Monday, December 2, 2013

Terrain: Scratch Built Candles


I am really glad I decided to create some candles for the stature. I like imagining imperial citizens scrambling up the ladder in lulls between gun fire to ensure the Astartes are properly worshipped. The ladder is still to be painted, but I left it in the shot because it adds more sense of scale.


Candles:

  1. Bretonian lances cut to shape
  2. thread drilled into the top of the candle and inserted as a wick
  3. white glue used to build up dripping wax areas
  4. gloss varnish in the paint in order to give a little shine


In the photo above you can see a mattress pushed to the far corner of the Shrine of the Aquila. I am not sure I managed to pull it off, but maybe when I add a make shift table it will work better. The bottom shot has a tea lamp that will be used for destroyed vehicles. I am going to make 5 of them so the battle looks more dynamic as games progress.


Sunday, December 1, 2013

Terrain: Statue With Posters


I knocked this up last night when I could not sleep. The glue hasn't even dried, yet I've gone ahead and painted it. I just couldn't resist sticking those posters all around it. The statue is not attached. It can be removed and replaced with some other device or monument. I found a great tutorial on how to make candles using sprue and white glue. those will come next.

If I can keep this pace up for at least two more ruins, then I think I will have a really nice gaming table by next weekend.

Saturday, November 30, 2013

Terrain: Propoganda Posters


One of the things I always wanted to do was detail the interior of buildings differently than the exterior. Broken bits of furniture, ammo crates, and propaganda posters. While waiting for one of my new molds to cure, I decided to hunt down some suitable posters for the inside of the shrine of the aquilla. I found this post on Bell of Lost Souls, and found the ones you see here.  Then I went on over the Recalcitrant Daze and found some even better sets that he had put together.  What I need to find now are some coffee cups to set on one of the ammo crates. At the moment I am hunting for suitable maps that I can print out. I imagine in a world as devastated as the one I am creating, the local PDF would have had communications severely compromised.

I think it would be interesting to work some LEDs into the mix. I was thinking about adding a little scene with a generator and signaling light or sensor suite.

All this prep work is making me really excited for the next Armies on Parade.

*EDIT

A worn out mattress pushed up in the corner of the building. That is what this model needs.

*EDIT

I decided to build a plinth for one of the statues. This gives me a really nice place to put candles, and posters, and will act like a center piece for the board. It is still drying, but should be painted up and weathered tomorrow. I'll take a better photo later. I just wanted to show a quick preview. The exposed brick came out really nicely, and makes an otherwise boring block a bit more interesting. It was easy enough to do that I may try this with a building.


Terrain: Painted and Weathered


I was stuck out here during thanksgiving in order to support my companies' systems, so while my wife enjoyed Los Angeles, I got to get some terrain built and painted. I think she might be pleased to find out she avoided a lot of mess. The sheer amount of mess painting and weathering created cannot be understated. It is always kind of fun when people see our main living room with wrap around windows and mid century modern decore, to then see my office, with paint splattered floors, miniatures, air compressors,  and half finished projects everywhere. Everyone needs a bat cave right?

I learned quite a bit building these first pieces of terrain. Some of the rubble dissolved after several applications of diluted white glue, which only became clear when the first lick of paint went on. I think buildings look ok, but I liked them a lot more during earlier stages. Too much of the stone work I carefully laid out during construction got obscured by sand and rubble. I may use this to my advantage on other buildings, since it will cut down on unnecessary detailing.

So, things I like: Statues. Quick, Easy, Awesome: QEA

I really like the space marine statue. I won a painting competition a while ago at the GW Springfield store and received one of the marine statues as a trophy. I feel kind of bad repainting it, but I loved the way the first one came out and decided I really had to have two of them.  I am looking for things that look like candles, so I can put offerings all around their feet. I think it might be cool to have notes, letters, and posters pasted all around their feet. It would also make it look like some people survived the bombardment. Otherwise the city will look completely deserted.

I've got a few more buildings to build and paint, and then I can break out my battle board and see about updating the painting on it.

Once I figure out how to remove my crashed thunderhawk from its display board and make it a movable piece of terrain I should have a good looking battlefield.

Thursday, November 28, 2013

Terrain


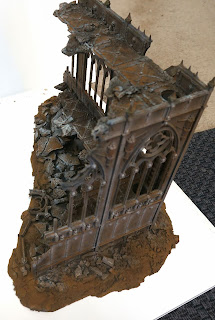
I haven't built terrain in a long time, owing to the fact that I do not game at home. After attending two tournaments, I decided it was time to finally built the table that I've always wanted to play on. These buildings are my practice pieces. One of the things that I do not like about the GW building kits is how they look like sets rather than actual ruined buildings. I've tried with these models to add enough debris and concrete chunks to make them look a bit more realistic. I am not sure if I have succeeded, but I am happy with them. Once the million gallons of glue dries I look forward to painting these guys up. I've been itching to paint the giant copper imperial eagle with weathering powders, but I am going to have to wait a bit longer.

One of the techniques I plan to use heavily later on, is casting floors with embedded wire mesh. You can see the first attempts in the larger building, where the concrete chunks are held together with what looks like wire. This attempt was a bit too think. What makes the mesh so important is that it allows the plaster to be chipped, cracked, and have holes added while holding together. It acts and looks like rebar.

Happy Thanksgiving Everyone!

Sunday, November 24, 2013

Rotor Cannon Squad Sons of Horus


I think Rotor Cannons might be Tau killers, but even if they are not, they are just too cool not to have a full squad of them. The SoH are really starting to come together. I have a lot of colors I need to work in across three different forces, but you can already see the beginnings of it. I was planning on painting boarding marines, but I might do some work the requisite conversion piece needed for most painting competitions.

Saturday, November 23, 2013

Sons of Horus Sergeant


The rotor cannon squad is finished. Now all they need is tracks for their rhino. But before that they need a Horus Heresy Haiku.

This is a sergeant
His helmet plume is orange
Death and loyalty

I think a boarding squad is next. Dave's squad makes me want to break out mine. I plan to paint their shields a pale white green color with dark chipping and streaks.

Sunday, November 17, 2013

Demios Pattern Rhino Sons of Horus


I've had this rhino since it came out. Now that I am experiencing a fit of Horus Heresy inspiration, it has finally seen some paint. Unlike most rhinos I paint, I decided to paint everything. One of the coolest features about these kits is the interior, which I almost never see painted. At the moment the tank is fairly empty, but more details will be added. I was thinking about putting some posters, oaths of moment,  and ammo crates.  The top hatch probably needs a tactical arrow painted in pale almost white blue-grey. This way the rhino will match my veteran helmets.  A squad with rotor cannons will get this ride.