Tuesday, February 27, 2018

Primaris Ultramarines Army So Far


I have had the bases completed for this army for a while, so I sat down today and based all of the new Primaris marines that I have painted. I really like how the force is coming together, but I am having some trouble with my dull coat, which is peeling off in some areas due to me handling the model. It is an easy fix, since all I have to do is respray a diluted new coat, but until I do so, the glossy undercoat shows through. This is not the display board for these guys, but I had it laying around.

Once the bulk of the troops are painted, I'll go back and add paint chipping and streaking to their armor. For now though, only the vehicles will be weathered.

Wednesday, February 14, 2018

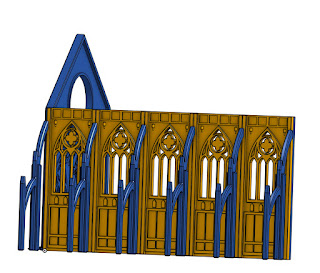
3D Terrain Modeling


With the help of a friend, I've been learning Onshape to produce CAD drawings of terrain we need for our tables. I am astonish by how quickly I am taking to it. This is not normally how it goes when I start learning a new trade. With only a few days under my belt, I've managed to design two terrain pieces for 6mm wargamming. The first is a 28mm 40k-ish building. The second is the beginning of a freeway. I was initially worried about too much detail at such a small scale, but the Form 1+ SLA printer picks up so much detail, that I could easily go with smaller features.

The first print of the building looks fantastic on a Form 1+ SLA printer. I think our Epic Armageddon tables are going to look fantastic!

Thursday, February 8, 2018

Custom Bases Painted With Pigments


In a twist of fate, the pigment I normally use on my 30k miniatures, Green Earth, turned reddish orange when applied to the bases using an alcohol wash. To try and tilt the color back towards yellow, I made a water/alcohol wash and applied some more Green Earth mixed with some Yellow Earth. So here we are now, with a blotchy yellowish tone. I like it. The yellow plays off the blue of the ultramarines really well. Now it had been my intention to make these bases work with my older ultramarines bases, as well as my 30k bases. That goal was not met, but I am ready to base these guys an move on.

Friday, February 2, 2018

Casting Bases Using Dental Plaster


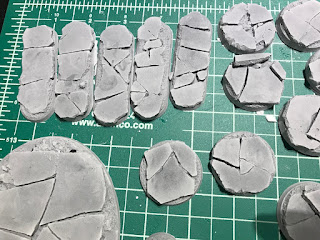
The process of making moulds can be pretty easy if you are interested in casting dental plaster and don't intend to use a pressure pot or vacuum chamber. I decided to create a full set of master bases for use across my 40k and 30k armies. I won't use these for all of my miniatures, but it is extremely nice to have a set of bases ready to go whenever I want to create some. An added benefit is that while my regular bases are normally fragile, the solid dental plaster bases are not. These are incredibly durable. Also, since my bases are supposed to be concrete, as they get scratched the grey color material underneath looks like fresh cracked cement adding to the overall effect. 


Step 1: Make master bases


 Step 2: Build mould boxes


Step 3: Spray a coat of primer over the boxes to ensure that any super glue used during construction of the bases or the boxes is covered. Superglue will cause the silicone to cure badly, leaving soft uncured goop where it touches.


Step 4: Mix your silicone. I used two different types of silicone here, one that cures in 6 hours and another that cures in a slightly shorter time. I believe the purple dense one is OOMO 30.


Step 5: After waiting over night, release the silicone from the mould. Try to save your masters. They can be used if desired. (I won't, my masters get dumped straight into storage)


Step 6: Using Excalibur dental plaster start pouring bases. The key to a nice flat base is to overfill it and then after the plaster has started to separate from the water and sink into the moulds, to gently scrape the surface using a flat edge.


 Step 7: Paint. The small 25mm base on the right is one of the new bases. The 50mm base on the left is one of my old bases from several years ago. The 25mm base wasn't even primed. That cement is raw plaster with a dose of Secret Weapon Miniatures Green Earth pigment washed over the top. I then went back and scraped the base with an x-acto knife to add some designs.