Tuesday, May 31, 2016

Thirty Houses Cast


I am finally beginning to see the light at the end of the tunnel for this project. There is an awful lot to do on the buildings, including pouring the missing floors, finishing the the roofing, and adding all the fiddly details that make terrain look really cool. However, I think the overall feel of the board is beginning to take shape. I like where this is going. There are some centerpieces that need to be completed, but those are waiting some moulds from overseas.

On this project, I am going to be spending more time on the terrain than on the models that will fight over it. I think that is probably the right balance of time. As Wargames Soldiers and Strategy put it in one of their recent issues, 'terrain is for life'.


Friday, May 27, 2016

And Now Some Ruined Houses


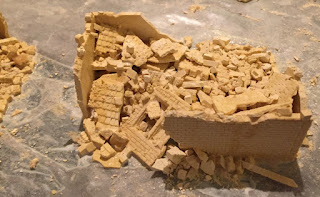
After constructing buildings all day I looked around and saw a pile of offcuts and broken bits. A few minutes later I had two ruined buildings. One of them is a ruined stone duplex. The other is a brick structure similar to the brick city houses I was building. I think the mass of debris for the duplex looks ok, but the brick house debris pile is a bit small.

Ever Onward Building Houses


The newest style of house is a stone duplex with external outhouses and a walled garden. The walls are not done yet, but you can glimpse one of them in the top left of the second photo. I am beginning to feel a bit fatigued by the process, but I think the results will look really nice painted up an placed on the tabletop. I have a more intricate large building design that when places with the others will provide a more Belgian feel to the city. One thing I have to resolve is how to attach the two roof halves on the duplexes. I managed to make my original roof moulds a tad bit too short.

One thing I am really looking forward to is making the partially destroyed buildings. I think they will go together pretty quickly, and will add a lot of narrative value to the table.

I think I might do another dozen and then stop. I think I'll have fulfilled my club duty at that point.


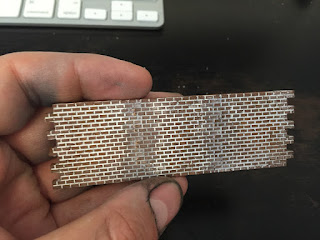
The image above is a quick paint test on one of the damaged wall sections. I tried 4 colors, along with some selective shading on the piece. I think I like a combination of all three colors across the bottom edge. The yellow does not work but perhaps it will grow on me in time.

Wednesday, May 25, 2016

Construction Begins On Market Garden


Our club has decided to attempt a rather ambitious club game covering the battle of Arnhem during operation Market Garden. Normally I would cast each side wall separately, but for some reason I decided I wanted each floor to be removable. This has slowed down the process, and due to increased carelessness on my part, resulted in some pretty terrible wall joins. On the other hand, we have floors! Just the thought of trying to dig Frost's paratroopers out of all of these buildings makes me cringe. I guess that is what artillery is for. Better make some ruins!

Thursday, May 19, 2016

Prototype 20mm Row House For Bolt Action


What you see here is the first prototype row house, that I constructed to test some Linka molds and a new type of plaster. Before embarking on a significant project, I like to test the waters with some prototypes. I learned quite a few things this time around.


  • Garrecco plaster is vastly better than Magic Merlin. It takes a full day to become rock hard, but it can be de-molded in 30 minutes. 
  • Garrecco needs a thin coat of watered down white glue to provide a good surface for painting. 
  • Floors can be easily poured into each level using masking tape. Once dry, the piece is solid. 
  • Linka molds are wonderful for their lego-like quality, but require so many pours of plaster that it becomes numbing. It would be better if I had duplicates of the most important molds. 
  • An entire city built this way would take a long time if I did not make molds of semi-completed buildings. 
I am very pleased with the results and will be using Linka and Garrecco to make additional buildings.  These will be split into roughly two camps. I'll be making factory buildings, office buildings, and larger apartment buildings for industrial tables, and then row houses, shops, corner buildings, and assorted small town stuff for villages and city outskirts. In a dream version of this, I'd be able to cast whole buildings with a single pour. That would drastically increase throughput and let me build larger table sections. 


Wednesday, May 18, 2016

Using Enamel Washes on 4Ground Buildings & Other Stuff


 I've been experimenting with terrain construction techniques for a while, and figured it was time for a catch all post.

First, behold the power of enamel paints! One of the best new methods I've found for painting is just dumping acrylics and switching to enamels. What you see here are a few examples of enamels in action.

Like many WWII war gamers, I couldn't resist buying some pre-painted 4Ground buildings. Rather than keep well enough alone, I've been upgrading them. First I played with acrylic washes, but recently I have been using enamel washes instead. I make these by taking thinner + Humbrol enamel paint and mixing it into a milky consistency. The results are spectacular for brickwork. The cafe above benefited from a white enamel wash used to shade the mortar. I'm really happy with the effect. So much so, that I've decided I have to replace the roof sections with more detailed casts. I'll show that later.

The last two photos are of some dental plaster casts I am playing with. I found a new plaster called Excalibur, which produces incredibly strong casts. It is much stronger than Magic Merlin. I've actually dropped pieces of my cast and had them survive without chipping. What I am building is a series of row houses from Arnhem. We'll circle back to Arnhem after my Pegasus bridge table is completed, but I liked where the casting was going and wanted to show the building. Each floor is removable as well, including a cool attic perfect for snipers. I should probably make some stairs in order complete the detail, but for now residents will have to use ropes to change levels. Besides, it makes it easier to place models inside.

Just wait till you see the destroyed buildings! (all those bad casts are useful after all)


Thursday, May 12, 2016

Upgrading Pegasus Bridge


The Pegasus bridge comes pre-painted, but since the color is only on one edge of any given sheet, the model had a strange cell-shaded quality about it. What you see here is my first pass at upgrading that paint job. I wasn't sure where I wanted to go with it, but I knew it needed a dusting of grey to color in the dark laser cut edges. One thing always leads to another, and despite the fact that the bridge is not even ready for paint, I decided to paint up the warning stripes on the barrier. 

I intend to upgrade the bridge's detail as well, so using some green stuff and the diamond pattern of one of my sculpting tools I took a quick stab at doing some sandbags. If I were working at 28mm I would have used tobacco pouches soaked in glue, but there aren't any of those scale appropriate for this 20mm bridge. (1/72 scale as opposed to 1/56) I'm happy with how the sand bags turned out, which is good, since I have to create a lot of reinforced areas. The table will have two sets of zig-zag trenches with sandbanks along the top rim. The Germans dug those in to protect the banks. The circular sandbag sections will be movable, and should provide the German players the ability to setup different medium machine gun nests. Of course, if you reinforce and area and then swiftly loose control of it to a 3x larger force, it will only be that much harder to take it back. That is the idea at least. 

Does it make sense to partially paint stuff while the model is still being built? No. On the other hand, I enjoy this process more so since it gives me a glimpse of what the table will eventually look like. This is sort of like sketching.