Sunday, April 29, 2012

Thunderwolves and Long Fangs A Break From My Ultras


I am not invested in how these Space wolves turn out, which is totally liberating when it comes to painting. I get to try all kinds of different blending techniques, and not worry about consistency between miniatures. When I painted the first two minis it was really just a way for me to stretch my legs with the new GW paints. I chose Space Wolves because for all practical purposes I had not painted them before (ok--a couple of years ago I painted three of them) A few dogs/wolves later and now it looks like I might end up with a full SW army. In keeping with the long tradition of the SW chapter, I am only kitting my Long Fangs out with missile launchers. Anything less would be un-wolfy.

Now while I am painting these guys with a loose, sort of sloppy feel, I do have some SW minis that I should spend some more time on. I managed to pick up a couple of squads of 13th company a while back, which I think will add some great character to the force.

So, I suppose I have to paint two more long fang squads right........


Saturday, April 28, 2012

Thunderwolves Underway & A Haradrim/Tallarn Mashup


Canis Wolfborn, three thunder wolves, and five of the new wolves are now underway. One of the changes I made from the previous fur recipe was to airbrush fenris grey along the belly,just after the bane blade color. Next, I plan to use a 25% wash 75% water ratio for the agrax earthdirtshadeButReallyIsMud color. I can easily see myself producing an all wolf army for my Space Wolves force. I know it would be terrible from a game perspective, but eh, paint what you want to right.
(a little saturday stream of consciousness should be expected only one coffee in)

Just for kicks I decided to use the new GW painting guide to paint one of the Tallarn models I have been slowly amassing. Instead of going Tallarn traditional, I decided to follow the LoTR Haradim tutorial. I thought it would be just an amusing mash up, but then I noticed my 10 mumaks, and how nice the would look painted like the Haradim elephants and well.....maybe my Tallarn might be LoTR Themed. Do mashups work?

So what are your plans this Saturday? How about painting up a mashup?

Thursday, April 26, 2012

Wolves


Long before the new running wolves came out for the Space Wolves, I purchased a bunch of what were labeled wolves on the GW site. It turns out they are mounts for goblins I think, and have piggish features. However odd the sculpts were, they are excellent test models for Thunderwolf cavalry which is built and ready to be be painted. Having never painted dogs/wolves before, I did a little research and found a video for painting wolves up on buypainted. I think the link was youtube, but whatever the case, you are pointed in the right direction. These wolves took very little work with the help of the airbrush. The thing to note is that while the colors are a little off due to morning photography, the wolves looked much better prior to adding washes to them. I think 50% is the new 100%, and 25% is the new 50%. The washes glazed the model rather than stay in the recesses, which would be nice if I were worried about pooling, but alas, I am not.

Grey Wolf Recipe

  • Base color: Eshin Grey
  • Top color: Abbadon Black
  • Belly color: Fenrisian Grey
  • Nuln Oil 50% strength wash over full model

Tan Wolf Recipe

  • Base color: XV88
  • Top color: Rhinox
  • Belly color: Baneblade 
  • Agrax Earthshade 50% strength wash over full model
  • Light dusting on the feet and nose of ushabi bone

Brown Wolf Recipe
  • Tan Wolf Recipe
  • Base color: XV88
  • Top color: Rhinox
  • Belly color: Baneblade 
  • Agrax Earthshade 50% strength wash over full model
  • Light dusting on the feet and nose of ushabi boneAgrax Earthshade 100% strength wash over full model

I am out of test models now, so short of dunking these in simple green, I may just start on the big daddies themselves. That is of course unless anyone knows of other tutorials I should watch, or other material I should read before I paint these wolves up.

Sunday, April 22, 2012

Space Wolves Painted Using New GW Paints


My painting experiments continue this Adepticon weekend. I had planned to get some games in at the Springfield GW store, but a series of utterly uninteresting house chores held me back. On the other hand, I decided to use my available hobby time experimenting with the new GW paints, and the GW how to paint book/dvd.

As always, my first experiment was to grab an old mini and see how well the new colors would map to my existing BA force. I've got plenty of blood red stockpiles, so I am not particularly worried about finishing the force, or having paint available for touch ups. The mini chosen was one of the old 'Armor of the Imperium' minis, and is slightly out of scale compared to newer GW sculpts. I think the red turned our fairly well, but despite claims to the contrary, watering down the layer paints is still necessary.  This mini was painted primarily by brush, so it does not represent how I paint these days.

My second experiment was to use the GW paint book as a guide for colors, but my airbrush as the the delivery mechanism. I've had a whole Space Wolf army in storage for some time, so I decided to break out some new minis to see what I could accomplish if I applied myself a little bit more. One of the nagging things worrying me was whether I was letting lack of effort affect my opinion of the new paints. Despite the airbrush, I tried to use the paints pretty much as is. The real hang up for me in painting these is figuring out how to use the new washes. As you can see on the Space Wolves, I had a really hard time keeping the washes where I put them, and rather than smoothly shade, they were essentially a really thin paint.

Overall I am pretty happy with the Wolves. I don't know SW heraldry at all, so hopefully these guys are painted appropriately for sergeants of tac squads.

I've been enjoying Ron's photos of his work area, so I thought I would share mine. (It is a total disaster right now!)

Tuesday, April 17, 2012

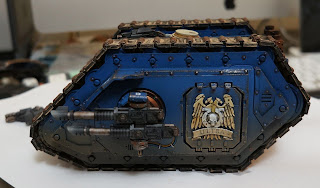
LR Proteus Dusted, Paint Chipped, And Powdered


Round one of weathering is done. The tracks are not glued on yet, but I plan to do so soon. The tank really feels like it belongs with the old school rhinos driving along side it. I am really pleased with how this tank has been coming along. There are a lot of details and changes to the way I paint that I think I will be able to incorporate into the rest of the force. This guy and the CAR will definitely be part of my armies on parade.

Monday, April 16, 2012

LR Proteus Base Coating Done!


My Proteus is finally base coated. The next step is to adde the transfers, perform the paint chipping,  and then add the dust up the lower half of the tank so it matches my other Ultramarines vehicles. I am going to attach the tracks last, so I can dust the tank, and then weather the tracks using weathering powders. This is a great kit, though it is very fragile.

Inexplicably I used the new GW paints to finish off the tank, and I think parts painted with them look worse than with the parts I painted with the original paint set. I'm not going to let that detract from my enjoyment of the kit though. I think it will all tie together with the weathering. I have been waiting months to get to the fun final steps, so maybe I'll save them for tomorrow. Why rush at this point right?

Saturday, April 14, 2012

Land Raider Proteus Update


I decided to give the new GW necron silver dry paint(don't remember its real name) a try on my Land Raider Proteus's tracks. Normally I would airbrush the tracks, but since they were available, primed black already, and sitting near one of the new paints I thought I should give it a go. I am not sold on the dry compounds, but I think the tracks look ok. The tracks will receive a layer of dust, and then weathering powders so  the tank matches the rest of my Ultramarine units.

I really love this model, so I just wanted to share it. Maybe I'll even finish it one day. Of course if I do that then I won't have it hanging around my painting desk keeping me company.

Wednesday, April 11, 2012

Vostroyan Painted With New GW Paints


I know I said my next paint experiment using the new paints was going to be an OOP rhino, but I decided last minute to paint something that would be easier for me to strip. A few minutes later I had Vostroyan trooper in hand. It makes sense after all, aren't regular army types the traditional guinea pigs for experimentation?  This miniature was painted using the following rules:


  1. Only use new gw paints
  2. paint directly out of the pot (I did thin the verdigris---I did this out of habit and stopped when I remembered the rules)
  3. follow base + wash + base + layer model

I'd tell you which paints I used, but the names are ...well you know.

When I showed the mini to my wife and asked her what she thought, she paused for a long time. "The paint is think" was her primary remark. If you've been following my work for any amount of time, it should be apparent that I like as little paint on a model as possible. It is why I use airbrushes for my base coats, and why I thin my paints as much as possible. I don't like the look of heavily painted models. On the other hand, I don't think this guy is as bad as my first test mini with the new paints.

Lessons learned so far:


  1. The washes do not set in the recesses when used out of the pot.
  2. Mephiston red really is a beautiful color
  3. The metals need a lot of shaking, and brass/gold may be usable for copper.
  4. The silver metals are just as terrible as mentioned before. They clog details.
  5. The GW method makes it faster to paint because there is no mixing, and no thinning.


Tuesday, April 10, 2012

Basing With New GW Paints


I've been trying to stay positive about the new GW paints, but at this point I am not a fan of the change. Generally speaking (and that is the only way to speak given how impossible it is to remember the paint names) the new paints have worse coverage and larger pigment sizes.  On the plus side these paints are pre-thinned, which will really help new painters who painted directly from the pot before. This makes the new range more accessible to the newbie, and I think many more higher quality miniatures will show up on gaming tables because of these changes.

After buying ~500 dollars worth of paints(yes I bought all of them) I rushed online to Amazon and bought as much of the old line as possible. That was merely a delaying tactic. Eventually I will have to use the new paints.

So you've got my bias now.

What do we do now? Well, if you are like me and have a large sum invested in new paint  you've got to experiment with it. Let's see where we stand:

  • Metallics: Fail (They should not even be sold)
  • Base In General: Fail (Exception for the blood red replacement)
  • Layers: Pass (The concept of layer paints that are pre-thinned is ok)

What I tried in the image above, is use the weird sand/paint stuff to texture the dirt areas in-between the bricks. I also used the new dev mud replacement. At the very end I used one of the weirder dry paints to dry brush the top. I don't hate how the base came out, but the odd plastic-like texture on the sides is a bit off putting. The base color does not seem to self-level well, and dries with streaks. The dry brushed area looks ok. I think that model fits in line with how GW intends the paints to be used.

Now it may be that these paints behave better in an airbrush. I am going to find that out tonight. I intend to paint up another original rhino to see if it can end up looking like one of these:


Given that GW's color matching does not make sense, I am going to match the paints by hand. Hopefully I will be able to show results equal to or better than my existing work. Anything less and I will be....well sad really.... It will be as if GW stole my hobby from me. (ok that is a bit dramatic. I love GW after all!)

Saturday, April 7, 2012

Test Mini With New Paints


After rushing out to GW Springfield to buy a load of new paints, I had to rush home and try them out on a test mini. Now I normally use an airbrush for most of my painting these days, so given that I would be only using a brush, and not really caring about the finished product, I decided  to paint a Black Templar. Oddly enough, I am not entirely sure what the Black Templar color scheme really is outside of the white shoulder pads and black PA. In any case, the Templar-ish scheme allowed me to experiment with the base and layer whites, as well as the grayish-white dry paint. Additionally I used the red glaze on the shoulder pads.  I went a little wild with edge highlights in order to learn how the paint would flow.

Some quick observations.


  • White still does not paint that well, even though these whites are clear improvements. It is lumpy and chalky, but better than before. Space wolves grey is still my favorite white replacement.
  • The layers stay wet longer and flow really well. this really helps blending and edge highlighting.
  • I miss the old paints. I am a little lost with all these colors. 


I'll experiment more with these tomorrow, or maybe I'll just paint with my old paints, who knows.

*EDIT

So I played around with the Space Wolf base color as well as the tutorial on painting them from the latest GW. The metallics cover well, but that is because they are really heavy. There are pluses and minuses to this. The older silver colored metallics work better for me. The colors are more consistent, and they clog much less detail. The new golds will have their uses, but they do not produce the kind of brilliant gold that  previously was a stable for painting icons.  I do like the darker space wolf color, but I will have to see how it goes through an airbrush before I can commit to using it.


Thursday, April 5, 2012

FW Armored Proteus


I am not sure what the deal is with FW parts these days, but I have had quite a few misses recently. The FW Proteus has a weird mashed area above the door, as well as chapter doors that do not fit right. On the other hand....FW resin=crack. I just can't buy enough of the stuff. Even in non perfect form I love FW. The Proteus finally has painted doors now, which will get paint chipping and dust weathering along with the rest of the tank once transfers have been added. I hope to finish this guy sometime this weekend, and may even take the opportunity to finish some of my BA models.

ok...got to shake off those new paint jitters and get to work!