Friday, July 24, 2015

Death Korps of Krieg Test Mini


EDIT #2 Photos above show results of alcohol used to fix pigments to the model. Additional silver paint chipping was added as well


* EDIT Better color on the photos above. Added color to interior of coat.


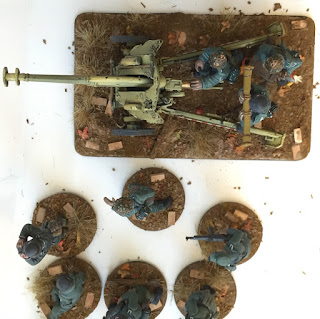
I am about half way through putting my NOVA Narrative Death Korps of Krieg force together, and decided to paint up a test miniature. These miniatures are tremendously difficult to paint due to their small size. Knowing that, I thought a good strategy would be to desaturate the colors. My initial critique is that I should have painted the interior of the coat a contrasting color so it shows up better. Other than that, I am on the fence with the scheme. It looks dirty and dusty which seems realistic to me, but it also lacks the visual pop that normal goes with GW armies. The army will have two additional colors that may make things a little more dramatic. Vehicles will be painted a greenish color covered in dirt. Interiors will be green-white. The army colors will be orange and white, which will appear on flags, vehicle markings, and some infantry models. Do I proceed, or is it time to go back to the drawing board?

1st EDIT: Added white/grey to interior of coat (a little sloppy but the idea comes through)

Tuesday, July 21, 2015

Cast Buildings For City Fights


Historicon was a blast. I'll have a whole post dedicated to it coming up shortly. There are just too many photos for me to edit right now. Suffice to say, the terrain at Historicon is leaps and bounds beyond what we normally see at conventions. All of that beautiful terrain fired me to up paint up the rest of the test casts to see what the village could look like. A normal order of operations would be to finish building the model before adding painted floors and details, but I just wanted to see them. This will make finishing the interior walls a little tricky, but I'll manage.

The blockiness of the structures has me a little concerned. I have loads more dormers to add, which will help a little, as well as little addition to go on the back, which add doors and steps into the buildings. However, I think these will come into their own when backyards are added. I am tempted to make the backyard part of the terrain piece itself, since that will allow some fun modeling activities. On the other hand, it will constrain where the pieces can be used. I still need to model up the shop window to the long buildings. That converts them a bit and breaks out the outline some. After that corner shops are in the queue

Of course NOVA is fast approaching, and I have not even built the army yet. Maybe I should take care of that. I suppose I could reuse an older army for the NOVA Narrative event though. That would allow me to focus on some display pieces and the corresponding terrain to go with them.

Thursday, July 16, 2015

Quick Building Paint Test


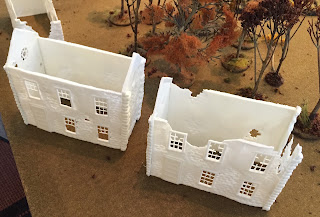
Historicon starts today, so I won't have time to properly paint these buildings, but I thought I would lay down some quick airbrush work in order to see how the buildings might look on the table. I like it. The mold is a bit rough, but I think a cities worth of these buildings on the table is going to look really good. I might lighten the white up a bit, and add more blue to the slate roofs. Other than that, I plan to use, red, green, and blue as the trim colors. I am not sure about  straying from a white-ish tone for the plaster areas though. Normandy looks pretty consistent in that regard. The interior of this building is not painted (the floor is not even in), but once it is, I think it will be much more interesting. I plan to user period wallpaper and colors for the interior, so there will be bits of design and color showing through the windows and holes. I'll pay considerable more attending to painting the rest of the buildings. I just had to see one of them in color.

So what would you build with this many houses? Would you make any changes to the color scheme?

See you guys at Historicon!

Wednesday, July 15, 2015

Bolt Action Normandy Terrain WIP


I finished the mold for the roof, dormer, and chimney pieces yesterday and was able to cast up a bunch of buildings. The white resin makes it difficult to see the detail, especially the slate tiles on the roof sections, but I they do give a fair view of where the project currently sits. I've constructed 7 houses, and have 8 more all cast up, but not glued together. I am heading to Historicon tomorrow, so the houses will have to wait a bit before they are finished. What is next?


  • 2nd story floors
  • Roof beams for buildings suffering damage
  • drain pipes (copper weathering looks really good next to stone)
  • debris piles in corners of buildings
  • Furniture for some of the buildings
  • transparent plastic in some of the windows to simulate broken glass
  • Wallpaper inside buildings that have visible interior walls
  • finally painting. 

With 15 buildings base as part of the table, I think I need to add backyards, a canal, modern bridge, street lamps, telegraph poles, fountain, church, and some kind of suitably impressive administration building. I might even pair these buildings with my DKoK for the NOVA Narrative event. Of course in order to do that I'll have to get started painting my DKoK.


I'll be at Historicon through Sunday. If you want to say hi, stop by the Bolt Action tournament on Friday. My German Heer will be making an appearance. 

Tuesday, July 14, 2015

Casting French Buildings For Bolt Action


The first step is  building a master. I took a kitchen knife, and carefully sliced off the paper backing of once side of a piece of  foam board. Then I carefully cut windows. After that I threw away the first attempt and tried again. Rinse and repeat. Eventually I settled on this master set of building parts. Using a metal stamp made out of an old brush, I stamped bricks into the soft foam. A gentle coat of vallejo texture paste provided the non-ruined areas. I tried to leave a lot of bricks exposed, because I will cover some of those up after the parts are cast.


With those master parts, I could move onto mold making. I made the mistake of using super glue to glue the buildings down. Super glue interacts with the two part silicon and keeps silicon from curing properly. Fortunately the bad cure was not in a visible part of the model.


I mixed up a 1:1 ratio of Mold Star 16. This stuff cures in 30 minutes, so for the impatient like me, it allows same day casting.


The resin cures in 6 minutes, which is fast enough for me to get a fair number of casts in a single day. In the image above you can see the resin going from clear to the cured milky white color. I found this stage mesmerizing.


After a bit of casting I had a whole village. Now, to spice up the terrain a bit, and not have all identical buildings, I started pouring partial casts. This produced the ruined sections you see above. I think those will look really nice with exposed floor boards and torn up roofs. I also experimented with really shallow casts in order to produce open windows. Unfortunately I discovered this after I had made a load of buildings, so there will be plenty of solid windows.


There are still parts to mold. I just got carried away with my test casting and kept going.  I plan to  add shop fronts with large windows and signs, new end of row sides, and smaller buildings to fit back to back in a row.  After that will come sheds, chimneys, drainage pipes, and maybe a precast ruined floor to pop in.

Friday, July 10, 2015

Castable Building Masters Using Pressed Foam Board


I've been wanting to upgrade the terrain on my Bolt Action table for a while in order to create a village in normandy. One of the things I need to do is scale down the buildings so they fit better on the table. At the moment the buildings are quite large. What I am going for is blocks of row houses, and corner houses. To to do this I need to create some master parts which I can mold and customize. One of the things holding me back was the tedium of creating windows and window pane glass. Micro mark solved that problem for me with one of their 1:48 scale packs of architectural details. My intention now is to keep windows, signs, and doorways separate and add them to the modal as needed . This will also allow me to model the buildings with slightly different window designs, and shutters open or closed. Key towards doing this casting job, was creating masters that had brick and stone detail. The idea is that once the basic parts are made, the exposed brick areas can be puttied over as desired to make houses in various states of repair. I had planned to use actual scale bricks to do this work, but that proved tedious. Instead I took a foam core poster board and removed the paper from one side. Once that was done I cannibalized the ferrule (metal part that holds bristles) from a brush and made it sort of brick shaped. Then I was able to just press the brick tool into the exposed soft foam and create bricks. The last step is creating a silicon mold of each side of the house so I can case the main sections. Once that is done I should be able to make any number of houses, and damage them individually. I plan to create roof sections as well as flooring. I might even make the 2nd story removable. I am just not sure it is that important for the game.

Thursday, July 9, 2015

Historical Bolt Action Army Nearing Completion


I am in the home stretch with my Bolt Action army for Historicon next week. The big hurdle was basing. I decided to mix magic merlin plaster with pigments to create the earth tone you see here. I then added leaves, twigs, and scale model bricks. After that I had dried I applied a very dilute mixture of alcohol + water + weathering powder. That toned down all the colors on the bases and made them recede a little to the background. All I need to do now is touch up all of the base rims with black and add random tufts of static grass. I might even throw in some yellow flowers to make the vegetation look more interesting. After all, plants don't grow alone.

I just realized that I forgot to paint chip the vehicles. So thee steps forward, one tiny tedious step backward.

Friday, July 3, 2015

The Difference Oils Make


These models have had a single pin wash of oils at this point. Despite that, I thought it was worth sharing, since it shows how big a difference such a little thing can make. I think I could probably get these on the table at this point, but there are a few more stages that will make them look better. The next step, chipping, will be as big a leap forward. Once the models are covered in chips, a second layer of oils will be added. The final step is weathering powders. I love using powders and usually can't wait to get them on the model, but they really need to go on last.

I know SDKFZ 251s are not great in the game, but I think they add a huge flavor to the tabletop. With these guys coming to completion, I'll finally have an enemy for my Soviet and American forces.