The first step is building a master. I took a kitchen knife, and carefully sliced off the paper backing of once side of a piece of foam board. Then I carefully cut windows. After that I threw away the first attempt and tried again. Rinse and repeat. Eventually I settled on this master set of building parts. Using a metal stamp made out of an old brush, I stamped bricks into the soft foam. A gentle coat of vallejo texture paste provided the non-ruined areas. I tried to leave a lot of bricks exposed, because I will cover some of those up after the parts are cast.
With those master parts, I could move onto mold making. I made the mistake of using super glue to glue the buildings down. Super glue interacts with the two part silicon and keeps silicon from curing properly. Fortunately the bad cure was not in a visible part of the model.
I mixed up a 1:1 ratio of Mold Star 16. This stuff cures in 30 minutes, so for the impatient like me, it allows same day casting.
The resin cures in 6 minutes, which is fast enough for me to get a fair number of casts in a single day. In the image above you can see the resin going from clear to the cured milky white color. I found this stage mesmerizing.
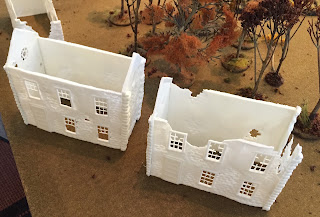
After a bit of casting I had a whole village. Now, to spice up the terrain a bit, and not have all identical buildings, I started pouring partial casts. This produced the ruined sections you see above. I think those will look really nice with exposed floor boards and torn up roofs. I also experimented with really shallow casts in order to produce open windows. Unfortunately I discovered this after I had made a load of buildings, so there will be plenty of solid windows.
There are still parts to mold. I just got carried away with my test casting and kept going. I plan to add shop fronts with large windows and signs, new end of row sides, and smaller buildings to fit back to back in a row. After that will come sheds, chimneys, drainage pipes, and maybe a precast ruined floor to pop in.


