Thursday, April 16, 2015

US Paratroopers C-47 Skytrain For Bolt Action


After tidying up my US Paratrooper army, I decided to tackle the huge C-47 transport that will see them into battle. The skytrain does not provide anything rules-wise, but it does give the player controlling the airborne a model to hold over the table as the parachute markers are dropped (you can see the drop mechanic over on Steve's blog). I think it will also make a good piece of terrain for some games as well.

I tackled the model how I usually tackle things these days. I decided I wanted it painted and gave myself a day to do so. On a model this large that was a mistake. It was difficult to make sure I wasn't damaging the paint job as I was flying through the painting process. The plane was cumbersome to paint, and the decals were weird. They are some kind of not-decal that I hope to never come across again. They did not respond to micro-sol at all, and remained kind of rubbery.

The paratroopers are mostly done. They'll get some more vegetation added to the bases at some point, as well as shoulder patches and rank markings. I just have to figure out what ranks to apply to the models.

Wednesday, April 8, 2015

Sons of Orar Marines Part 1


Step 1: Painting White
Add a dark grey base coat using Mechanics Grey. Vallejo thinner works fine with it. 
 Step 2: Using Tamiya X-20A Thinner instead of Vallejo, shade Uthuan grey over the majority of the shoulder pads. Spray the heads from the top and sides towards the front. Do not use vallejo thinner, it will clump the paint in the air brush.
 The gradient can be seen on the shoulders.

Using Vallejo white and Vallejo thinner, add a spot highlight a the top of the pad, or on whichever part of the pad is closest to the light source.

 Gloss varnish the pads in preparation for decals.
 Add a thin coat of micro set to each pad. Then apply the decals. Make certain that there is a cut between the two bottom sides of the Orar symbol. The top won't settle down easily if this is not done. Once the decals are on, apply micro sol and wait. The decals will look terrible initially. This is a patience game. Apply more micro sol as necessary. Go grab a coffee and come back and be surprised!

Marines were painted predominately with Mephiston red thinned with Vallejo thinner. At this stage you can see the colors achieves by layering Mephiston. A tiny bit of Evil Sunz Scarlet was used to edge a few of the plates. Sons of Orar are dark, not vibrant red. This will be toned down with oils and washes.

Soft armor and exhaust vents were painted with blowgun metal, and then washed with nuln oil.


This Zombie marine suffered the result of Vallejo matte varnish. The blue tint of the varnish really deadened the paint job. Some other varnish should be used. I have no idea what to use at this point, but Vallejo is out for red!


 Two oil pin washes were used, dark yellow for the white areas and dark brown around each armor plate.

Chipping effects on tanks and vehicles are easy to apply with wild rider red and german black brown. I usually apply the highlight color first and then add the chip on top of it.


Wheels and any rubber parts like road wheels should be painted dark rubber rather than black or brown. 
Slightly better photos


Pre-Shading Bikes (this can save some coats of mephiston red)

Monday, April 6, 2015

Sons of Orar Bone Basing


 Step 0: Prime Black
Step 1: Base coat with Steel Legion Drab (SLD)
 Step 2: Shade panels with Zandri Dust (ZD). Make sure to leave SLD showing in places.
 Step 3: Shade panels with Screaming Skull (SS). When shading make sure that as many dark edges meet light edges. 


Step 4: Mix a weathering powder wash using Secret Weapon Miniatures Green Earth Pigment (GEP).  Add enough thinner to the water/powder mixture that surface tension is broken so the pigment flows easily.

The last step is to neatly edge the bases using Steel Legion Drab.

Saturday, April 4, 2015

Floor Mats for Fields


After a great game of Bolt Action with the first showing of my 101st Airborne Division, I thought it was time to make a few more fields. (If you want to read a really good write up about the game, and even see a cool animation of me dropping scale parachutes to determine troop deployment go visit Steve's blog)

As before, these fields were made out of a Home Depot dark grey rubber floor mat, that was first sprayed brown using Krylon paint. Each row received a a first pass of colored static grass, followed by either green flock, or more static grass. I am getting pretty close to the point where I need to start making proper bocage to intersperse between the fields. Fields provide nothing rules-wise, but they really add to the visual appeal of the table.

Friday, March 27, 2015

Upgrading Pre-painted River Terrain


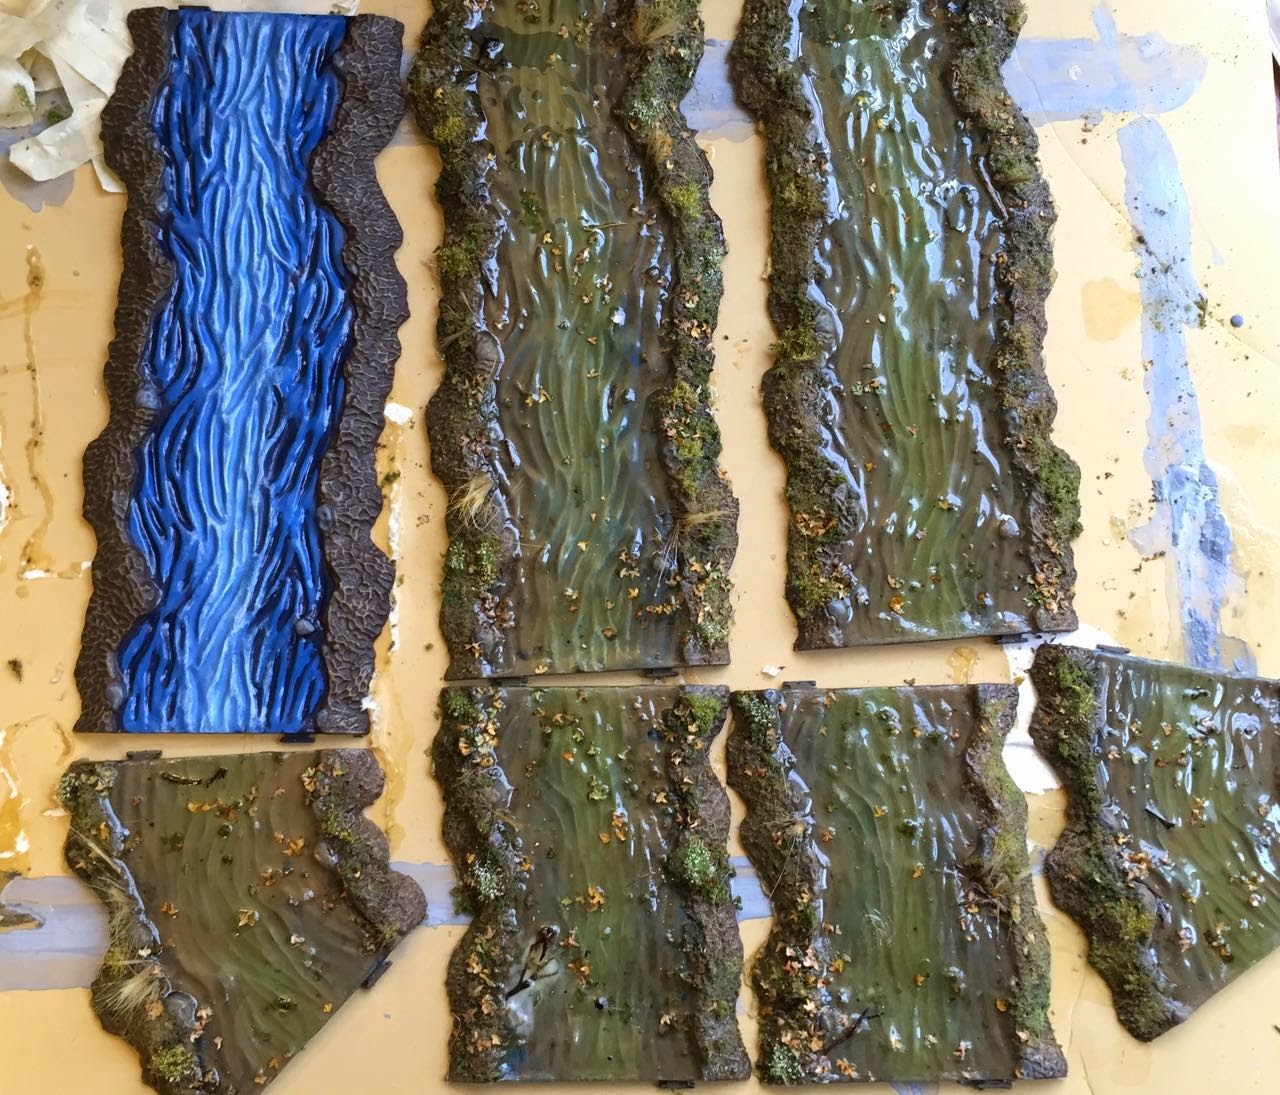
Sometimes you just don't want to scratch build it. I know I could have made river sections by hand, but it was far easier to just buy the Pegasus river sections and re-paint them. In the photo above you can see the dangerously blue Pegasus painted version of the river. My fix was simple. Using an airbrush I sprayed on steel legion drab on the riverbed, and then added a bit of turquoise to the very center of the river. After that was done, I layered in static grass, flock, and autumn colored leaves. Just to make thinks interesting I poured my remaining stock of Realistic Water from SWM, followed by Water Effects by GW all over the sections. After waiting a week, I had the very usable, and much improved sections on the right. One more box of river sections to go, and I'll have some new usable terrain.

Was it worth it? What do you think?

Friday, March 20, 2015

Sons of Orar


A Terminator and a spare Rhino side hull were used for this experiment. There were several goals. One of those was to use as much GW paint as possible, and the other was to keep the the mix of colors to a minimum. 


Sons of Orar have white as part of their heraldry. Rather than use full on white, the area is based with fortress grey, and then mostly covered with Ulthuan Grey. A touch of white is used around the edges. It is important to use as little white as possible. White will be used during paint chipping, so it needs to contrast with the grey beneath it. On shoulder pads, whit is only used a the extreme top of the pad. The majority of the pad being left a grayish color.

The main body of the rhino was painted with only two colors. The black basecoat, and mephiston red. The color modulation was achieved using a diluted mephiston red mixture in an air brush. Anywhere two panels came together, more coats of mephiston red went on.


The bottom sides of the smoke stacks were masked off so a gradient could be added.


The gradient is on the right.


With only two panels of the rhino hull completed, the benefits of modulation can already be shown.


Finished color modulation. Wild Rider red was used to highlight rivets. I recommend using this on faces, and front panels of tanks. As the extreme highlight it should be kept minimal. The next step is a gloss coat to protect the paint from oils. Behold the ugliness which is gloss.


A satin coat was sprayed on to dull down the gloss. Vallejo has a blueish tint to their dull and satin coats. I will not use them again for future Sons of Orar, as it interferes with the color too much.


Steel Legion drab was sprayed to add dust to the lower area of the hull. Pigments will be used as well, but I like the tinting the paint does to the the white door and the lower hull.


Side by side with a Sons of Orar Terminator. The pigment used here is Secret Weapon Miniatures green earth.