Thursday, May 19, 2016

Prototype 20mm Row House For Bolt Action


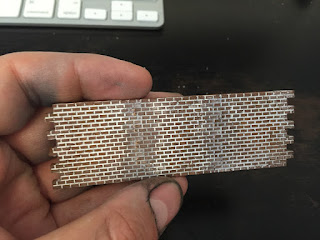
What you see here is the first prototype row house, that I constructed to test some Linka molds and a new type of plaster. Before embarking on a significant project, I like to test the waters with some prototypes. I learned quite a few things this time around.


  • Garrecco plaster is vastly better than Magic Merlin. It takes a full day to become rock hard, but it can be de-molded in 30 minutes. 
  • Garrecco needs a thin coat of watered down white glue to provide a good surface for painting. 
  • Floors can be easily poured into each level using masking tape. Once dry, the piece is solid. 
  • Linka molds are wonderful for their lego-like quality, but require so many pours of plaster that it becomes numbing. It would be better if I had duplicates of the most important molds. 
  • An entire city built this way would take a long time if I did not make molds of semi-completed buildings. 
I am very pleased with the results and will be using Linka and Garrecco to make additional buildings.  These will be split into roughly two camps. I'll be making factory buildings, office buildings, and larger apartment buildings for industrial tables, and then row houses, shops, corner buildings, and assorted small town stuff for villages and city outskirts. In a dream version of this, I'd be able to cast whole buildings with a single pour. That would drastically increase throughput and let me build larger table sections. 


Wednesday, May 18, 2016

Using Enamel Washes on 4Ground Buildings & Other Stuff


 I've been experimenting with terrain construction techniques for a while, and figured it was time for a catch all post.

First, behold the power of enamel paints! One of the best new methods I've found for painting is just dumping acrylics and switching to enamels. What you see here are a few examples of enamels in action.

Like many WWII war gamers, I couldn't resist buying some pre-painted 4Ground buildings. Rather than keep well enough alone, I've been upgrading them. First I played with acrylic washes, but recently I have been using enamel washes instead. I make these by taking thinner + Humbrol enamel paint and mixing it into a milky consistency. The results are spectacular for brickwork. The cafe above benefited from a white enamel wash used to shade the mortar. I'm really happy with the effect. So much so, that I've decided I have to replace the roof sections with more detailed casts. I'll show that later.

The last two photos are of some dental plaster casts I am playing with. I found a new plaster called Excalibur, which produces incredibly strong casts. It is much stronger than Magic Merlin. I've actually dropped pieces of my cast and had them survive without chipping. What I am building is a series of row houses from Arnhem. We'll circle back to Arnhem after my Pegasus bridge table is completed, but I liked where the casting was going and wanted to show the building. Each floor is removable as well, including a cool attic perfect for snipers. I should probably make some stairs in order complete the detail, but for now residents will have to use ropes to change levels. Besides, it makes it easier to place models inside.

Just wait till you see the destroyed buildings! (all those bad casts are useful after all)


Thursday, May 12, 2016

Upgrading Pegasus Bridge


The Pegasus bridge comes pre-painted, but since the color is only on one edge of any given sheet, the model had a strange cell-shaded quality about it. What you see here is my first pass at upgrading that paint job. I wasn't sure where I wanted to go with it, but I knew it needed a dusting of grey to color in the dark laser cut edges. One thing always leads to another, and despite the fact that the bridge is not even ready for paint, I decided to paint up the warning stripes on the barrier. 

I intend to upgrade the bridge's detail as well, so using some green stuff and the diamond pattern of one of my sculpting tools I took a quick stab at doing some sandbags. If I were working at 28mm I would have used tobacco pouches soaked in glue, but there aren't any of those scale appropriate for this 20mm bridge. (1/72 scale as opposed to 1/56) I'm happy with how the sand bags turned out, which is good, since I have to create a lot of reinforced areas. The table will have two sets of zig-zag trenches with sandbanks along the top rim. The Germans dug those in to protect the banks. The circular sandbag sections will be movable, and should provide the German players the ability to setup different medium machine gun nests. Of course, if you reinforce and area and then swiftly loose control of it to a 3x larger force, it will only be that much harder to take it back. That is the idea at least. 

Does it make sense to partially paint stuff while the model is still being built? No. On the other hand, I enjoy this process more so since it gives me a glimpse of what the table will eventually look like. This is sort of like sketching. 

Monday, May 9, 2016

4Ground 20mm Pegasus Bridge and Cafe For Bolt Action


 It was only natural to want to do a Pegasus bridge board after painting my 20mm AB British paratroopers, so feeling a little experimental I decided to pick up my first two 4Ground MDF kits. What you see above are the kits as delivered with some additional paint and weathering on the cafe model. The bridge was a pretty rough build, since I did not realized there were replacement parts for the individual sections in the box, but the problems weren't so bad as to keep me from an ok model. I did have to do some creative construction of the superstructure, but I doubt the gaming group will care about the little incorrect details.

I've decided that I have to re-paint the bridge entirely in order to remove the weird cell shaded effect, but I think I can use the inherent shading to provide a sort of pre-shading. The cafe is a whole other story. I plan to weather it, but I can't decide to repaint it or not. The little touches I did like painting some random 'errors' on the model to make it look a little more natural helped, as did making the recesses in the roof dark colors rather than white, but I might just build the table first and see how the cafe integrates into it.

My next post will likely show an upgraded bridge, though I am eager to paint a crashed Horsa glider..

Friday, April 29, 2016

Speed Aging Bourbon


I've been interested in speed aging spirits for a while and thought it was finally time to take some very young bourbon and pair it with a point of new slightly toasted wood chips. What you see above is the product of only six days of soaking. The right shot glass shows the raw-ish bourbon, while the left shot glass has the new oak steeped version. Can you guess which one is drinkable?

The altered bourbon is sweeter now with caramel and vanilla flavors. The aroma is intensely vanilla. After another week of soaking, I am going to dump the mixture (wood and all) into a dentists ultrasonic cleaning vat. My hope is to use the agitation to speed up the esterification of fatty acids. Normally that process would take years. I imagine six hours will be enough time to shake free some esters. If that works then the bourbon should take on a more floral quality normally found in aged Scotch. What this process won't do is remove the angel's share, that portion of alcohol that escapes through the oak barrels over many years.

I have a whole slew of additional tests underway, including aging a raw corn un-aged whiskey, as well as experimenting with darkly toasted wood chips. The dark chips should add a smokey flavor.

What is most exciting here is that I can buy a variety of white whiskey's and age them with different blends of wood with different toast levels.

Friday, April 22, 2016

AB 20mm British Airborne


Continuing our groups move from 28mm to 20mm (1/72 scale) models,  I picked up some AB miniatures British Airborne to round out our troop choices. I have become a huge fan of AB, and am really enjoying the painting process.

As is customary with me, I am painting the entire platoon of 45 miniatures at once. What you see here are just a few models taken closer to completion in order for me to refine the process as I go. In this shot you can see the sole camouflage jacket attempt. I looked up what  the camo was supposed to look like and it really just looked like the brits took paint brushes and slopped it on. My rendition is bad though. It is probably just a matter of working at this scale, but I think I have to lighten the colors significantly if I attempt the tri-colored camo again.

Friday, April 15, 2016

Space Wolves On The Painting Table


I finished the Caestus earlier in the week, but lighting wasn't right until today for photos. My original plan to edge highlight the paint chips was dropped due to practicality. I just didn't want to do it! I am painting these space wolves for me, which means sometimes I don't do things the 'right way', but rather the way I want to at the time I am painting. The rhino and the Caestus were meant to be the equivalent of a pallet cleanser for painting, but somehow mid-way through the rhino I decided to rummage around my closet and come up with way more Space Wolves than I though I had. I even have one of those single boom Caestus things GW released in plastic. I guess the question now, is whether I continue painting SW vehicles, or try my hand at some infantry. There is a nice box of SW terminators sitting unopened not far from me.

Happy Painting!
-john

Tuesday, April 12, 2016

Space Wolf Rhino WIP 2


While painting the Caestus Assault Ram, I bounced back and forth between it and the rhino painting details. At this stage the rhino is awaiting final weathering. The interior needs paint chipping, and the exterior needs to be weathered with mud rather than light colored dust. That is one of the nice things about weathering. I can simply brush off the light earth and try again. I think mud and all of the accompanying splashes will really help this paint job out.