Friday, July 31, 2015

Death Korps of Krieg Combat Engineers & HQ


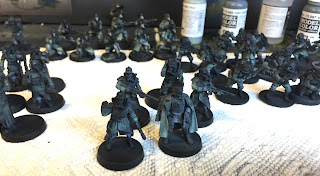
I am finally nearing the point where some of the models are looking finished. This is where the long push starts to pay off and the models begin looking like the finished pieces. I still have a ways to go on them, but I can start envisioning what they will look like on the board.  The engineers have more washes, glazes, and layers to go, but the overall feel of the models is now set. Basically if you squint at them now and squint at them once all of the shading is done, the models will basically look the same. Engineers are a really characterful unit. They do the heavy lifting in the Krieg forces, building forward observation posts, trenches, and artillery emplacements. The 12 painted here will allow me to field two squads if I choose to do so, though likely they will end up joined in one big squad walking behind a tunneling hades breaching drill. I am not really sure what to do with the mole mortar. It looks like a pretty iffy unit game-wise, but it looks good paired with the breaching drill.

One of the time consuming tasks for NOVA besides the models themselves is the display board. I relish this part of army construction. However this year I have some problems. I have so many models that a normal 2x2 board simply isn't large enough. I'd really like to have a board with trenches and emplaced artillery, but what do I do with all the extra models? My list includes 3 heavy artillery pieces, 3 quad launchers, 3 medium mortars, 3 bombards, loads of infantry, and then 30 death riders. That takes a lot of space. I've though about doing a multi-level display, but really have no interest in that. Maybe I should bring an entire table to NOVA. :)

Thursday, July 30, 2015

More Death Korps


*EDIT picked my final color. Orange.


It seems like I have been painting leggings and gas masks forever. I've painted so much these past two days that I think I am straining my eyes. However I am now at the half way point. Some decisions have to be made as well. I painted the rad counter box bootstrap leather colored as a sample. This is the same color I painted the guardsman's boots on the right. It is likely the same color I will paint their rucksacks. Is that too much brown? The shoes could remain a dirty black color, and the rucksack could be a dark yellow. However every additional color I use adds hours to the project timeline. I've got three Bombards to paint as a reward for painting so many of these guys, but at this point it feels like I might not reach the end.  In a worst case scenario, I can easily pair these guys with my Sons of Horus. At this point I have three troops choices, an HQ, and 20 men to crew artillery. It probably be a better army composition to ally them with Horus, but horses. Horses really ought to be part of my list.

Wednesday, July 29, 2015

Bolt Action Jagdpanther


I realized at Historicon that I had not posted any photos of my Jagdpanther for my Bolt Action German force. I am enormously proud to have won 1st place for historical vehicle. Historicon has opened up a whole new style of game play to me, in addition to painting challenges. Richard Rush, from our gaming group as well, took home two well deserved 1st place medals. His historical single miniature is simply outstanding. I have a few zillion part ww2 scale models that might actually get painted for the next HGMS event.

Ok, back to Krieg. (don't they have a striking resemblance to German Heer?)

Tuesday, July 28, 2015

Death Korps of Krieg


With my color scheme mostly down, batch painting of DKoK has begun. Hard to believe I have to paint ~60 of these guys. I think this is going to take longer than I anticipated. Unfortunately, I really only have 5 days to get this batch done. The 30 Death Riders are going to take a fair bit longer since I still have to sort out their misshapen legs and greenstuff all of the gaps. Despite this, it feels really good to have finally dived into the project I have been slowly collecting for over six years.

Saturday, July 25, 2015

Death Korps of Krieg Unit Test


Thanks to everyone who has been making suggestions on the color scheme. I have painted as long as I can stand to paint today, and almost have a squad to share with you. It has been fun doing live updates like this, however I am spent. Loads of constructive input went into these guys. I included the melta gunner int the photo so you could see the progression. Most of the suggestions that went into improving that model ended up incorporated into the new color scheme. I may still paint up a squad in the darker brown color. I still kind of dig it, however I think the new scheme is much better.

Since I have to paint about a 100 of these guys, it is useful to paint up a test squad to see how difficult it would be. It turns out that I can probably kick out 1 squad every two days. The really killer is the webbing/leg wraps. Those take forever. I normally paint in silence, but for the big push I might need something to make painting all those wraps ok.

Death Korps of Kreig Test Mini #2


I appreciate all the comments on the last test miniature. I tried to push colors just a bit more with this guy, while keeping the overall model gritty and worn. I am particularly pleased with the model's pants. The coat is a little brushy, but I am trying to keep the painting time reasonable for these guys. I am lucky to have a horde of them. One thing missing from the model is the platoon number that goes on one of the dented metal shoulder guards. I'm keeping decals off of these until I lock in a paint scheme. Weirdly enough, this guy looks right at home next to the previous miniature. It had me thinking about painting up the models all slightly different shades of green and blue in order to show a battle worn force. I'm not sure how that would score paint-wise, but it could look pretty cool.

In terms of basing, I am thinking about using rendra bases instead of GW bases. I've come to like the lower profile of the flatter bases for my bolt action armies and think my GW forces need them as well. Flatter bases make the model look more integrated into the battlefield, rather than walking on a pillar.

This model has one of the gun arms that I mangled. The gun is simply covered in super glue, hence the weathering powders on it to cover up the lack of remaining detail.

Friday, July 24, 2015

Death Korps of Krieg Test Mini


EDIT #2 Photos above show results of alcohol used to fix pigments to the model. Additional silver paint chipping was added as well


* EDIT Better color on the photos above. Added color to interior of coat.


I am about half way through putting my NOVA Narrative Death Korps of Krieg force together, and decided to paint up a test miniature. These miniatures are tremendously difficult to paint due to their small size. Knowing that, I thought a good strategy would be to desaturate the colors. My initial critique is that I should have painted the interior of the coat a contrasting color so it shows up better. Other than that, I am on the fence with the scheme. It looks dirty and dusty which seems realistic to me, but it also lacks the visual pop that normal goes with GW armies. The army will have two additional colors that may make things a little more dramatic. Vehicles will be painted a greenish color covered in dirt. Interiors will be green-white. The army colors will be orange and white, which will appear on flags, vehicle markings, and some infantry models. Do I proceed, or is it time to go back to the drawing board?

1st EDIT: Added white/grey to interior of coat (a little sloppy but the idea comes through)

Tuesday, July 21, 2015

Cast Buildings For City Fights


Historicon was a blast. I'll have a whole post dedicated to it coming up shortly. There are just too many photos for me to edit right now. Suffice to say, the terrain at Historicon is leaps and bounds beyond what we normally see at conventions. All of that beautiful terrain fired me to up paint up the rest of the test casts to see what the village could look like. A normal order of operations would be to finish building the model before adding painted floors and details, but I just wanted to see them. This will make finishing the interior walls a little tricky, but I'll manage.

The blockiness of the structures has me a little concerned. I have loads more dormers to add, which will help a little, as well as little addition to go on the back, which add doors and steps into the buildings. However, I think these will come into their own when backyards are added. I am tempted to make the backyard part of the terrain piece itself, since that will allow some fun modeling activities. On the other hand, it will constrain where the pieces can be used. I still need to model up the shop window to the long buildings. That converts them a bit and breaks out the outline some. After that corner shops are in the queue

Of course NOVA is fast approaching, and I have not even built the army yet. Maybe I should take care of that. I suppose I could reuse an older army for the NOVA Narrative event though. That would allow me to focus on some display pieces and the corresponding terrain to go with them.

Thursday, July 16, 2015

Quick Building Paint Test


Historicon starts today, so I won't have time to properly paint these buildings, but I thought I would lay down some quick airbrush work in order to see how the buildings might look on the table. I like it. The mold is a bit rough, but I think a cities worth of these buildings on the table is going to look really good. I might lighten the white up a bit, and add more blue to the slate roofs. Other than that, I plan to use, red, green, and blue as the trim colors. I am not sure about  straying from a white-ish tone for the plaster areas though. Normandy looks pretty consistent in that regard. The interior of this building is not painted (the floor is not even in), but once it is, I think it will be much more interesting. I plan to user period wallpaper and colors for the interior, so there will be bits of design and color showing through the windows and holes. I'll pay considerable more attending to painting the rest of the buildings. I just had to see one of them in color.

So what would you build with this many houses? Would you make any changes to the color scheme?

See you guys at Historicon!

Wednesday, July 15, 2015

Bolt Action Normandy Terrain WIP


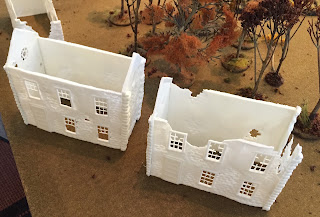
I finished the mold for the roof, dormer, and chimney pieces yesterday and was able to cast up a bunch of buildings. The white resin makes it difficult to see the detail, especially the slate tiles on the roof sections, but I they do give a fair view of where the project currently sits. I've constructed 7 houses, and have 8 more all cast up, but not glued together. I am heading to Historicon tomorrow, so the houses will have to wait a bit before they are finished. What is next?


  • 2nd story floors
  • Roof beams for buildings suffering damage
  • drain pipes (copper weathering looks really good next to stone)
  • debris piles in corners of buildings
  • Furniture for some of the buildings
  • transparent plastic in some of the windows to simulate broken glass
  • Wallpaper inside buildings that have visible interior walls
  • finally painting. 

With 15 buildings base as part of the table, I think I need to add backyards, a canal, modern bridge, street lamps, telegraph poles, fountain, church, and some kind of suitably impressive administration building. I might even pair these buildings with my DKoK for the NOVA Narrative event. Of course in order to do that I'll have to get started painting my DKoK.


I'll be at Historicon through Sunday. If you want to say hi, stop by the Bolt Action tournament on Friday. My German Heer will be making an appearance. 

Tuesday, July 14, 2015

Casting French Buildings For Bolt Action


The first step is  building a master. I took a kitchen knife, and carefully sliced off the paper backing of once side of a piece of  foam board. Then I carefully cut windows. After that I threw away the first attempt and tried again. Rinse and repeat. Eventually I settled on this master set of building parts. Using a metal stamp made out of an old brush, I stamped bricks into the soft foam. A gentle coat of vallejo texture paste provided the non-ruined areas. I tried to leave a lot of bricks exposed, because I will cover some of those up after the parts are cast.


With those master parts, I could move onto mold making. I made the mistake of using super glue to glue the buildings down. Super glue interacts with the two part silicon and keeps silicon from curing properly. Fortunately the bad cure was not in a visible part of the model.


I mixed up a 1:1 ratio of Mold Star 16. This stuff cures in 30 minutes, so for the impatient like me, it allows same day casting.


The resin cures in 6 minutes, which is fast enough for me to get a fair number of casts in a single day. In the image above you can see the resin going from clear to the cured milky white color. I found this stage mesmerizing.


After a bit of casting I had a whole village. Now, to spice up the terrain a bit, and not have all identical buildings, I started pouring partial casts. This produced the ruined sections you see above. I think those will look really nice with exposed floor boards and torn up roofs. I also experimented with really shallow casts in order to produce open windows. Unfortunately I discovered this after I had made a load of buildings, so there will be plenty of solid windows.


There are still parts to mold. I just got carried away with my test casting and kept going.  I plan to  add shop fronts with large windows and signs, new end of row sides, and smaller buildings to fit back to back in a row.  After that will come sheds, chimneys, drainage pipes, and maybe a precast ruined floor to pop in.