Wednesday, December 31, 2014

More Bolt Action


My hopes of completing the army before the New Year are dwindling, but I am very happy with how these are turning out. I have about 25 infantry and 1 truck to go to have a playable force. Once that batch is complete, I get to paint the tiger. Paint chipping and powders are being saved till all of the vehicle base coats are completed.

I might paint some 40k after I complete my DAK force, but my next Bolt Action force is likely to be an American contingent. I've been watching Band of Brothers, and really want to paint up some of the good guys.

Tuesday, December 30, 2014

Bolt Action Mercedes G3 Truck DAK


The DAK will be my first full Bolt Action army. This G3 truck is the first of the vehicles slated for the army. We haven't reached the point where we are using transport rules in our campaign, so I am not sure if transports are good game wise. However, they are fun to paint, and I can see these being important as scenery and objectives. In terms of color, I think I solved the problem by using a more brown base, and then a paler tan/yellow color for the shading. My hope is to paint enough of these up that we can come up with any number of interesting and different scenarios.

The more research I do into Bolt Action, and consequently WW2, the more I see how much Warhammer 40k has been influenced by both great world wars. For instance, that weird little spiked bumper on the original rhino/predators turns out to be a hedge row cutter like those originally fitted to Sherman tanks during the invasion of Normandy. It amuses me to see 40's era solutions fitted to year 40K vehicles.

Now, onto the sculpt itself. The G3 is from Company B miniatures, and is one of the worst casts I have seen in a long time. I think the model works well enough on the tabletop, but it would be impossible to paint one of these for a competition. So much rework would need to be done it would end up essentially being a script build. The model costs more than an equivalent truck from Warlord games, so if I were doing it again, I would buy from Warlord.

Monday, December 29, 2014

Bolt Action DAK WIP


I decided to let the yellow stay, and am well on my way to a playable force. These little models are pushing my painting quite a bit. After so many years of good quality Forgeworld resin, and GW plastic, it is a bit awkward painting models that have soft shallow detail. I love the sculpts, but the combination of size, and material quality make these difficult. I think GW has spoiled me! The Space Marine in the background is only there to provide scale.

I have made good headway on these, but the basing is holding me back. I really dislike the small plastic disk attached to the model, but I think the legs are too fragile to sepparate it. If there ever were a time for crackle paint, I think this would be it, however I think I am going to use a steel legion dust/bleached bone + straw colored tufts for the basing.

Anyone else have a big end of year army painting push?

Friday, December 26, 2014

DAK Bolt Action Miniatures


In painting my Desert Afrika Korps army for Bolt Action, I've run into a little snag. I really like dark yellow, and dark yellow is not the right color for DAK vehicles or troops. I should be painting the vehicles a mixture of sand color and brown, I just don't want to. This might just be a hold over from all of my Warhammer 40k painting, but I feel that historical gaming has a higher bar for what is acceptable paint scheme wise, and that if I do not commit to the more sandy color that it won't feel historical enough. Sometimes it is nice to worry about things that truly do not matter.

Regardless which way I go painting-wise, I wish everyone a happy holiday.

Monday, December 22, 2014

Secret Weapon Miniatures Tablescapes Urban Table Painting Part 1


A while ago Justin McCoy posted a beautiful city tile from his urban tablescapes product. I loved the result and thought I would see if I could produce similar results with less effort. I wanted to paint the table in no more than 3 painting sessions.  How I would paint a single tile is very different than how I would approach a 24 tile project, so I had to use spray paints at the base coat. What you see here is the product of two days painting. The steps were straightforward, and while oils and additional powders are coming next, I thought this was a good stopping place for a while. I think the table is usable now. 

So how did I get to this stage?

  1. Base coat all of the tiles with Rust-oleum matte iced gray. Cheap easy, but hellish overspray from the bottles. I work inside my office and had to do a quick emergency mopping to get the overspray off my hardwood floors!
  2. Spray Tamiya TS-4 German Grey directly from the can onto the asphalt sections using a piece of foam board as an edge to spray against.
  3. Grab and airbrush and spray tamiya flat black into each of the bomb craters. 
  4. Color modulate the concrete. Using three old CCG cards, I made a square edge with a handle that I could use to produce hard edged for each concert chunk. This took the longest time, but I think makes the terrain more interesting. Think of this as color modulation but on a huge scale.
  5. Using a darker version of the tamiya grey which shaded the concrete, shade the cracks and crevices on the asphalt. 
  6. Paint all of the metal black using a mask. This automated the process.
  7. Drybrush boltgun metal (yep still go some!) on all of the metal parts. Quick and easy don't really worry about how messy this is.
  8. Take a dark old rust weathering powder (one of the ones that comes in the SWM box of powers) and liberally wash all of the metal bits. This produces a nice rusty look over the black and blowgun metal base.
  9. Mix a huge pot of brownish weathering powders with Tamiya x-20a thinner and wash the surface of every tile. 
  10. Make two masks out of tape that can be reused to paint the side walks and lane separators. 
Things to do next
  1. Oil washes in all of the gutters to give the sides of the street that filled with gunk feeling. I might skip this given how many tiles there are. 
  2. Weathering powder wash of grey or light grey weathering powder. I think this will bring out the cracks in the streets more and even out the color over all. 
  3. Paint a load of buildings. I think I am going to stick with a lighter color for the building so they match the concrete. One of the benefits of the light sections is that they help models stand out more. 

Overall I really enjoyed painting these. I rarely attempt to paint something as large as a whole table, so I had to go more gestural to make it work. The tiles are a huge boon for the wargaming community. Thanks to Justin for taking a risk with a kickstarter of this magnitude. I can't wait to get some buildings on this table and take it for a spin. I think the moral of the story here is that I might paint 5 different armies a year, but I paint terrain rarely. Putting terrain on the same level as miniature painting makes the game much more enjoyable for me. I wish I hadn't waited so long to paint these.

*EDIT

Since a lot of other people have SWM boards, here is quick run down of the tools I made/used.

The first is an edge template made from three collectible cards. Any card with a glossy surface that won't easily absorb paint will do. I went through three of these painting the table. The idea is to spray darker color along 1/2 of each square on the tiles. I don't recall how long it took to paint the gradients, but it was the majority of the overall painting time. I saved the solid tiles for last, since they would take the longest. I think it took about an hour to do all of them. The process is tedious, though I really like the result. Normally I would use tape to mask the edges, but with so many tiles it was not worth the effort to the waste of tape!


The last things I made were templates for the side walks and lane dividers. This is just tape that I layered up until I could use it repeatedly. This allowed me to paint all of the street details in about half an hour or so.


Saturday, December 6, 2014

Autumn Trees and Bolt Action Germans


Despite a lack of posting, I have managed to get quite a bit of work accomplished. I finally decided that I wanted to have a table's worth of nice terrain. I think I've got the trees handled for now, and am ready to move onto the next pieces. So, how do people make rivers? I really want to paint river sections, but it seems like rivers would be heavy, difficult to store, and fragile if I made them out of plaster which is my normal building material. So how should I proceed? I really like the idea of having rivers, because I want to build bridges, but I am not inclined towards more storage nightmares.

So terrain aside for a moment, I do have some painting progress. My first squad of DAK troops has been painted using my test scheme. I am not totally sold on it, but the nice thing about DAK forces is that a wide variety of uniform colors were present in any given force. My next batch will have more of a sun bleached look. I also painted a JU-87 to accompany them. I know it is not in the tropical scheme, but it will likely see usage for both European and North African theaters of operation.


Friday, November 28, 2014

Trees and Bolt Action Jagdpanther


I experimented with my first trees today. In the lazy post thanksgiving haze, I decided to try and copy some trees seen outside my windows. After playing my third BA game on Steve's beautiful table, I decided I should contribute to the terrain pool. If you know of nicer ways to make trees please let me know. I am new to this.

The recipe so far is:

  1. basket black
  2. flat brown and grey 50/50 dusted all over the tree
  3. heavy wash of tamiya x-20a thinner and ancient green earth
  4. JTT foliage clusters 95072

If I had a lighter orange/yellow fine ground covering I would add that as a step 5. I think a lighter color on top of the branches would provide a little needed color variance and shading.

The Jagdpanther was painted in preparation for one of our bolt Action games. My BA models are almost test models for my DKoK force. At this point the color pallet is set for my next 40k army.


Sunday, November 9, 2014

Warlord Games US M3 Halftrack


One of the fun things about playing a new game is that none of us has a stock of fully painted miniatures. Every game is an opportunity to paint additional models to add to the group. Our collective lack of painted models also makes me want to paint models for both sides of the game, ensuring we have some interesting choices on game day. Because the forces are known and the color schemes are not surprising, we can easily mix and match from what we all have available. Hopefully this truck will get to serve with the US Infantry continuing its advance off of the beaches. Our next game table contains bocage, which are dense French hedge groves. I can see this truck following closely behind a Sherman tank, letting the Sherman cut a path through the bocage.


This kit is the plastic m3 kit from Warlord Games. The kit was a bit annoying to put together, and the driver is a bit mushy on the detail, but I am happy with the kit. It is the older all metal kits from Warlord that I would stay away from. Painting was quick easy. The dull coat added a blue tint which I've noted before. I thought it would not be as noticeable, but stands out pretty well. On this model I tried a new technique for the first time. I had been reading about tamiya Buff colored paint, and how a general spray overall added a nice subtle dust appearance. I mixed a roughly 10/1 thinner to paint ratio, and sprayed Buff all over. I think that worked really well. It is subtle enough to not have obliterated my shading, but also ties everything together. As usual powders are all Secret Weapon Miniatures. A second application of powders will be done on the tracks and a few key places such as the fenders.

Just realized that I forgot to add streaking!


Sunday, November 2, 2014

Warlord Games Bolt Action Panther WIP


I had my first game of Bolt Action a few weeks ago. It was good. It was really good. I strongly recommend the game, and think the mechanics could even cross over to 40k. The random activation mechanic, and the reduced dice rolling from 40k, makes for a fast reactive game where tactics appear to matter.  In one afternoon we managed to play three games of BA. Kudos to Steve for organizing our Bolt Action outing.

One of the benefits of Bolt Action, is that it is very inexpensive to get into, and there are a lot of alternatives to the heroic scale BA miniatures. This low barrier to entry meant that I have started three armies. I've painted more than one tank at this point, which is overkill for most games, but I think having some equipment variety will be fun for scenario building.

BA was designed for infantry tactics, so more than one tank is overkill. On the other hand, the tank expansion was just released, which allows for players to field platoons of tanks. A tank destroyer is on the painting table as I write this.

In the far back right of the second photos, a shot of the 30 German Heer infantry can be seen. Those are Wargames Factory models that I picked up for 20 dollars. A single box produced 5 squads, a sniper team, and an HQ section. There are downsides, the models have very shallow details which makes washes hard to apply, and the parts are labeled, but there are no instructions. I think the models will look nice enough on the field, and I like that they are more realistically proportioned.

In the wings is a D.A.K army which is undergoing paint scheme testing. I love the look of sand worn vehicles with Germany grey showing through, however I have yet to manage to make the look work.

So all things considered, I am loving this foray into historic gaming. I makes me want to build more interesting gaming tables.....and on that note, a giant box from Secret Weapon Miniatures arrived...whoa... so good.

Sunday, October 19, 2014

Bolt Action Stug


A bunch of us have been bitten by the Bolt Action bug, so a collective speed painting has ensured. Presented here is a resin Stug from Warlord Games. This model will eventually take part in the Normandy campaign, being setup. While fun to paint, this kit was unreasonably malformed. I enjoyed painting the model immensely, but this is going to be a gaming model, not a display model for me. The DAK models on order might end up being the gaming and display models.

WW2 models (basically anything non-gw) have become my modeling tests of choice.

At the NOVA Open I managed to win a full set of secret weapon miniatures weathering powders. I had already been using quite a few of them, but since I had the whole set I decided to give the track tutorial Justin posted on the SWM miniatures a try. The only thing I added was some more rust pigment on the spare tracks on the hull. You'd think that having every weathering powder would be the most exciting thing, but weirdly, I was more excited to try the bottle of pigment fixer included.  I 'd been using x-20A thinner as my pigment fixer, and had been wondering if actual pigment fixer would work any better. Well, it works, but due to me not understanding the bottle cap (you just have to see it--it is not a dropper!) I managed to poor out the entire contents of the bottle onto the vehicle, and my desk. I like how it worked, and will have to pick up another bottle.

So how does all of this Historical work play into 40k? I am thinking about painting my DKoK next, but with a historical bent.


Wednesday, October 15, 2014

Battle For Salvation


This Columbus day weekend, I had the opportunity to travel up to New York to attend the the Battle for Salvation 40k GT and play in their first painting invitational tournament. This is the first time I have heard of such a thing, but the idea is great. Play in a GT, but make the painting score count for more. I love this spin on tournaments.

I think if you play 40k, and live within a 5 hour radius of BFS you should attend. The tournament is that good. The guys that run it are top notch, and each year they put me down as a club member even though I live 4 1/2 hours away.

BFS got me thinking about army sizes, game lengths, and tournaments in general. One of the things that I regret at a tournament is that I don't have enough time to mingle. There are so many people I want to meet, and so many friends from all over, that we end up never seeing each other at the tournament but instead end up staying out all night trying to catch up. Wouldn't it be great if game time at tournaments was reduced? Eight games at NOVA was too much for me, even though it was an incredibly fun narrative event.  Six games at BFS better. I think 5 games with a lower points value would be best. Let's got back to 1500 or 1200 points.

How about this for different spin. Let's play x8 1000 point games. Game time would decrease dramatically, but we'd still meet new people. It would also cut out a lot of the cheesy units

You should book your hotel now for the next event. Don't get Nynack Motor Lodged! (The good hotels fill up quickly)

The competition this year for painting was really tight. Chris Dubuque showed up with his Lamenters and took away best painted miniature for his dreadnought. I was lucky enough to win Paint Master for the painting invitational.

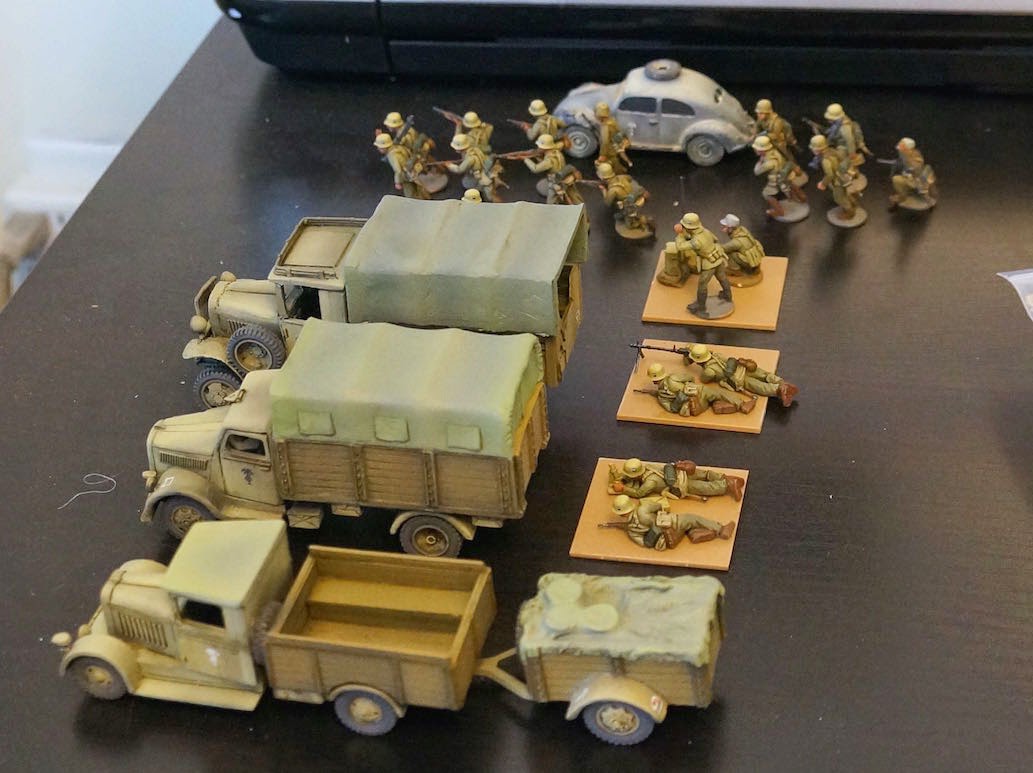
I am really proud of my Sons of Horus, that allows me to post photos of my latest creations. (hint--not so proud about them!) After the BFS paining award, I thought, "hey, maybe I'm a good painter after all" and tried to paint 16 WW2 US Army troops for Bolt Action in under 5 hours. This is why I don't paint IG. While the painting was fun, and the speed at which it happened was phenomenal, the minis are more like gestural pieces rather than art, but they are for a game I really want to try, and at least now I have some troops and a tank. 20 bucks for around 34 minis was not too shabby either. Ok, maybe I'll paint that other batch.

The moral here is simple. Don't get cocky. I did, and my desk is now covered in mud.


So there you go. A week in review. Go to BFS. You'll be happy you did.