Showing posts with label tutorial. Show all posts

Friday, February 2, 2018

Casting Bases Using Dental Plaster


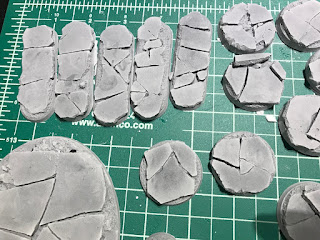
The process of making moulds can be pretty easy if you are interested in casting dental plaster and don't intend to use a pressure pot or vacuum chamber. I decided to create a full set of master bases for use across my 40k and 30k armies. I won't use these for all of my miniatures, but it is extremely nice to have a set of bases ready to go whenever I want to create some. An added benefit is that while my regular bases are normally fragile, the solid dental plaster bases are not. These are incredibly durable. Also, since my bases are supposed to be concrete, as they get scratched the grey color material underneath looks like fresh cracked cement adding to the overall effect. 


Step 1: Make master bases


 Step 2: Build mould boxes


Step 3: Spray a coat of primer over the boxes to ensure that any super glue used during construction of the bases or the boxes is covered. Superglue will cause the silicone to cure badly, leaving soft uncured goop where it touches.


Step 4: Mix your silicone. I used two different types of silicone here, one that cures in 6 hours and another that cures in a slightly shorter time. I believe the purple dense one is OOMO 30.


Step 5: After waiting over night, release the silicone from the mould. Try to save your masters. They can be used if desired. (I won't, my masters get dumped straight into storage)


Step 6: Using Excalibur dental plaster start pouring bases. The key to a nice flat base is to overfill it and then after the plaster has started to separate from the water and sink into the moulds, to gently scrape the surface using a flat edge.


 Step 7: Paint. The small 25mm base on the right is one of the new bases. The 50mm base on the left is one of my old bases from several years ago. The 25mm base wasn't even primed. That cement is raw plaster with a dose of Secret Weapon Miniatures Green Earth pigment washed over the top. I then went back and scraped the base with an x-acto knife to add some designs.


Thursday, February 11, 2016

Homemade Static Grass Applicator


My last static grass applicator was made out of an electronic fly swatter. This time around I decided to build it completely from scratch. It should be perfectly clear from my setup, that I am not an electrical engineer, electrician, or any sort of authority on the safety of building such a thing. I just wanted one. So I went online and purchased a negative ion generator(JP-D1221 ~ $10). The one I bought came with two white wires with brushes at the ends. The wiring was pretty simple.


  • Cut off the brushes from the two white wires on the negative ion generator. (the black box in the photo)
  • Connect both of these to a metal screen. In the photos my bases are sitting on the screen. 
  • Add a second wire to the negative pole on the battery. This wire will lead to a second screen, which is attached to an old paint brush. In this photo that assembly is sort of in the middle right of the top photo. This assembly is the shaker. 
  • Place bases covered in PVA on the lower screen
  • Flip switch if you have added one.
  • Add static grass to the applicator-spoon thingy
  • Shake it. Shake it.......

That is it. I had already tried to add a second layer of glue on top of the still drying static grass placed during my first go around. This mucked up the bases a bit, but the concept works in principle.  I think it is time for me to go out and buy some different lengths of static grass.

Tuesday, September 22, 2015

Building a Static Grass Applicator Out of a Fly Swatter


I usually stay away from static grass. Like many, I can never seem to make it come out standing up. Usually I end up with a weird little mashed pile of the stuff. Taking a cue from the name of the stuff, I searched online for a solution. It turns out that all I needed was a negative ION generator. Enter the bug zapper. 


It turns out that a bug zapper will do what I want. The basic principle is simple. Replace the racket head with a metal tea leaf basket and attach one of the two wires inside the device to the new static grass basket. Once that is done, take the second wire and attach it to a nail that will be positioned near any area needed static grass. Presto, a static grass applicator.  

So following that online, I made one.

These are the two wires I was mentioning. I cut away the originals and soldered on replacements.


In the photo above I've already attached the tea leaf strainer to the handle of the bug zapper, and have inserted the long wire into the test piece. I used regular white glue for the test. One gotcha here is that the current generated is not terribly strong, so the basket needs to be close to the nail. I'll improve this later. For a test, I think it worked pretty well.


After I had the device built I grabbed containers full of static grass that I haven't used in years and started experimenting. I think the results would be better if I had some different lengths of static grass, but I think it still worked pretty well. The model railroad guys seem to use a variety of lengths. I've seen them apply grass right over the top of a base layer of previously applied grass.

So, what do I do with this now? I've already experimented making tufts of grass. I know how to make patches. I played around with a pen mashing down areas of the grass to make it look trampled. I suppose I could add static grass to something big. Any ideas? What would you do with this?

Wednesday, September 16, 2015

Sometimes You Need Forty Feet of Bocage


I've been playing bolt action for a while now, and have grown to really enjoy how interesting battles are that take place in Normandy. In order to do the French countryside justice, I finally decided to make a boat load of bocage. I think these will work equally well at 1/72 scale as well as 28mm. (yes I know one of those is a height and the other is a scale)

With 40 feet of the stuff, I think we are going to be able to set up some really nice tables. Once an old stone french church is added it will be perfect.

Bocage Recipe

  1. Buy a green natural air filter and cut into sections
  2. Base coat bocage sections with brown paint
  3. Dust bocage sections with tan paint from above
  4. Spray 3M adhesive all over sections
  5. Roll bocage around in tray of woodland scenics tree tufts. (use at least three colors)

Wednesday, August 26, 2015

Building A NOVA Display Board Step By Step


This year I needed a simple, lightweight display board that would show off my DKoK army well. The DKoK force is so large that I needed to maximize space. To that end, I decided that less was more, and simplified the design. this board cost probably less than $30 dollars to make. This board was fairly easy to build, and if you avoid some of the traps I fell into it can look really good. 


Step 1: Cut pink foam to the desired dimensions using home depot wooden yard sticks as a frame. 


Step 2: Use a wire brush scrape the detail into the board


Step 3: Make a slurry of magic merlin plaster and coat the entire board thinly. This will dry hard to the touch in 30 minutes. All of the details need to be added now. Add sand, small rocks, balsa wood, jerry cans, oil barrels, and chains as necessary. I just pushed these into the wet plaster.


Step 4: Without priming, mix alcohol with weathering powders and paint on the gunk. I used two types of SWM rust colors, as well as their green color. These were essentially wet mixed.


Step 5: Dust the entire board with weathering pigments. Again, this was done with no primer. Once the board was coated in pigments I dumped a lot of alcohol on the board to set the pigments and get them to run. 


Step 6: Dust the board with the mid-tone pigment and highlight pigments. I used SWM green earth and SWM yellow earth to do this. I dusted yellow earth along the embankment.


Step 7: Steal a pot from the kitchen and melt woodland scenics realistic water in it. It comes in little pellets. Pour the water onto the display board and let it cool. I used popsicle sticks to spread the edges of the water/plastic out so a raised lip was not formed. I also poured the mixture into the craters. This is where all hell broke loose. The craters melted and the water started eating through the display board. One you are happy with the water, using a cooking torch I heated the surface to remove bubbles. It was at this point that I noticed that the debris in the river had started to melt, and that paint had come off large sections of it.


Lessons Learned: Use resin for the water, and don't dump so much alcohol on the board that it requires napkins to soak up.

Friday, August 21, 2015

Death Korps Aegis Defense Line And Camouflage Tutorial


In building my list for the NOVA Narrative event, I've wavered quite a bit as painting dragged on and on. However, just as I was finishing the last model I need for the 2k list, I decided to change it up. After all, what kind of artillery regiment does not have anti-air, or hard cover. So I dropped a commissar, and added an Aegis defense line and quad gun. The quad gun painted up spectacularly, almost surprisingly so. I was not expecting much from the model. I think the walls came out ok. I wanted them to look realistic. I also wanted to treat them like models, rather than scenery, which is usually painted at a lower standard. The level of detail is a little iffy on the walls, so I got out my hobby knife and added all kinds of battle/transport damage to them. Then I stood back and admired them. Something was wrong. If my Krieg had enough time to put up walls, they certainly should have also put up camouflage netting. So out came GW's Model Masterclass book. Fortunately there was a nice description of how to make this camouflage in the book. Here is my take.


Step 0
Cover model with plastic cling wrap.
Step 1
soak medical gauze in a 50/50 mixture of white glue and water
Step 2
letting the plastic wrap protect the model, lay the netting out so it conforms to the shape.
Step 3
cut out strips of tape and stick them all over the netting
Step 4
prime black, and paint as desired
Step 5
wish I had used a stickier tape


Tuesday, August 4, 2015

Ever More Basing For The Death Korps


I made really good progress this morning before the treadmill. It could have gone wrong though. Rather than follow my tried and true recipe using GW paints, I decided to mix things up a bit and use Tamiya air brush paints for these. After looking at the huge volume of painting to do, I decided that I really needed to avoid airbrush clogs at all cost. I am thrilled with the result. Granted that has more to do with SWM Green Earth weathering powder than my grey shading, but I like it none-the less. All I have to do is add black edging around the base, and I have enough bases for the force. Just in case I do some last minute list tinkering, I painted up some large bases to use with Krieg mortar teams. I love the idea have 6 more mortars to fire. When we play 40k with bolt action rules, the mortars are going to be incredibly important, since in BA they can fire smoke. That makes cavalry charges less hazardous. Alternately, it allows the dreaded Blood Pact (Dave, we have to play that game!) or Vrak's renegades (Steve, that is you!) sneak up and take out the artillery. If Greg ever paints up a huge force or orcs (I saw that painting tutorial, so I know you can do it quickly!) then we can also get in a guard on orc infantry game.

Got to rim the bases in black now. Better find a good documentary to watch.