Monday, March 26, 2018

Warlord Titan Weapons/Arms WIP 6


The absurdity of this model is clear. In order to pin the arms, I've had to use three foot long bolt cutters, and seriously large brass rods. The good news is that I am narrowing in on the most exciting part of the build.

mould lines!

That's right, once I have the armor plates attached, I'm going to start removing the visible lines. This way I can ignore mould lines that occur under the armor sections.

Saturday, March 24, 2018

Warlord Titan She Walks WIP 5


With all the prep work done, the pin holes we drilled, the glue was mixed, and the titan took it's first steps. Taking cues from Dave Taylor's  titan build, I took special care in leveling the pelvis.

Now we wait. In 24 hours I'll know if the Titan can stand without a base. I really hope it can, but the striding pose might be too much for that.

Friday, March 23, 2018

Warlord Titan Truing The Box WIP 4


The core of Warlord titian is box made out of irregularly shaped pieces, which are undoubtedly bent out of shape. Since I couldn't eyeball the fixes given all the curved shapes, I needed another way to true the thing.

Enter the humble rubber band.

What you see in these photos is not glued together, but rubber banded together. The idea was to use enough rubber bands to keep the torso in as close to the right position as possible and then use a heat gun to soften areas for adjustment. Lucky for me, it worked.

If you are going to build one of these, you need to have a heat gun. This would have been impossible to put together with out one.

One more thing I disagree with. The instructions have the torso built from the bottom up. I found it easier to start with the huge pieces that were less warped, and work down towards the floor.

Thursday, March 22, 2018

Warlord Titan Legs WIP 3


Instead of pinning the legs, I decided to drill holes into the titan in order to fill with JB Weld. I think these deep channels of JB Weld will hold the titan together well.

With the legs ready for posing, I decided to leverage the pelvis magnet and a lamp arm to use as a sort of chassis lift. I'm hoping this will hold the titan in place while I get the posing and eventual gluing right. It is a strange solution, but it appears to be working.

Monday, March 19, 2018

Warlord Titan Pelvis Magnets WIP 2


Progress is incredibly slow on these beasts, but I have a solution to the pelvis/torso joint. I think my embedded magnet in the pelvis coupled with 4 magnets in the torso will be enough to hold this guy together. At least I hope that is the case. So after coming up with the solution, I rewarded myself with a few hours of resin washing.

This is going to be a slow build!

Thursday, March 15, 2018

Warlord Titan WIP 1


The process of building a warlord Titan has begun. This beast came in a huge box from FW, and has many days of part washing ahead, but today I decided to dry fit the torso area, and plan the magnet placements. I think I can use two huge magnets to hold the torso onto the groin piece, but I won't know for sure until I dremeled out cavities for them.

I'm really looking forward to painting this! This guy will be at NOVA this year.

Tuesday, February 27, 2018

Primaris Ultramarines Army So Far


I have had the bases completed for this army for a while, so I sat down today and based all of the new Primaris marines that I have painted. I really like how the force is coming together, but I am having some trouble with my dull coat, which is peeling off in some areas due to me handling the model. It is an easy fix, since all I have to do is respray a diluted new coat, but until I do so, the glossy undercoat shows through. This is not the display board for these guys, but I had it laying around.

Once the bulk of the troops are painted, I'll go back and add paint chipping and streaking to their armor. For now though, only the vehicles will be weathered.

Wednesday, February 14, 2018

3D Terrain Modeling


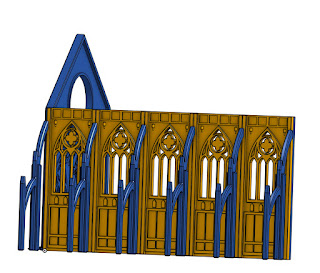
With the help of a friend, I've been learning Onshape to produce CAD drawings of terrain we need for our tables. I am astonish by how quickly I am taking to it. This is not normally how it goes when I start learning a new trade. With only a few days under my belt, I've managed to design two terrain pieces for 6mm wargamming. The first is a 28mm 40k-ish building. The second is the beginning of a freeway. I was initially worried about too much detail at such a small scale, but the Form 1+ SLA printer picks up so much detail, that I could easily go with smaller features.

The first print of the building looks fantastic on a Form 1+ SLA printer. I think our Epic Armageddon tables are going to look fantastic!