Monday, January 18, 2010

Magnetizing Ravenwing Land Speeders


There are two land speeders missing from my DW/RW force. Let me put this delicately...I hate putting land speeders together. I love the finished model, but with all the weird clamping, rubber bands, and luck needed to get them put together properly, I know that when I get into the build process I will be frustrated at some point.

Knowing this, I decided to magnetize my land speeders so I could produce all of the variants in the codex. My goal was to be able to change from The master of the raven wing, to a tornado, or to generic tank popper or infantry hunter without hassle.

I started with one Ravenwing battle force, and one stand alone land speeder box. My first surprise was that the land speeders are different kits. The RW boxed set had the old land speeder, along with enough missle launchers and twin linked assault cannons to last me forever. The regular land speeder added a heavy flamer to the mix, so I am glad I got both kits.

My magnetizing method is very easy, though there are a few gotchas.

  • figure out your magnet facings first, using a pen to mark them. The little buggers shoot all over the table while working, and I kept gluing them down upside down.
  • My tweezers are metal...ugg! You'll need some non-metalic implement for pushing the magnets around. I kept grabbing my tweezers by accident causing the magnets to de-seat from the glue and stick to them instead!


The process:
  1. Cut two small chunks of plastic-card rebar (not sure what it is called) to make magnet stands for the land speeders. Glue one magnet in the recessed center portion of each. Then glue the rebar chunk to the inside of the LS hatch area.
  2. Cut the nibs off of the doors/missile pods, and glue a single magnet as shown.
  3. done.


Saturday, January 16, 2010

Ravenwing Based


I had planned to do Mars like red earth basing for these guys, but woke up this morning and just based them with dirt and dead grass. I still haven't painted all of the wings, feathers, or done a lot of touch up work, basing them seemed to give me more focus. I am starting to like the miniatures now. You can't see it in the photos, but I added the cool looking gothic numeral 2 to their shoulder pads from the transfer sheets as well. I tried the forgeworld powders on the bases, but the dull coat ruined the effect. I may give a dusting to the bases and the undercarriage of each bike.

I put up a few shots of the force as it stands. For some reason I am painting this army differently than any I have before. The land raider still needs its hatches put on, there are touchups to the terminators to do, there are final decals, and heraldry partially completed this in addition to the RW being partially done. Even with all of those todo items, I am happy with how it is turning out. In the past I would have painted a full unit and then moved on. With these guys I am content to get them mostly done and then move onto the next unit so I have it to field. It is a different approach. The hobby itch is starting again, and I think I will paint up a DA rhino even though I have no PA squads. I need to build two land speeders so I will be done with the RW, but I just want to paint something green!

Hopefully I will be able to get a game in today, using a combined DW RW force for the first time.


Sunday, January 10, 2010

Ravenwing Pt2


I pushed forward with these guys, and at least have a full squad now (minus land speeder). I still need to do all of the touch up paint, and paint the feathers. I just don't have a great method of covering the black yet. I definitely rushed these guys, but I really want my Deathwing to have the homer beacons these guys come with. One full squad gives me 4 locations from which to center my DW assaults.

On the painting side of things, I was thinking about using forgeword powders all along the bottom instead of spraying a tan color with my air brush. I have so much stuff I want to paint right now I am probably going to regret some of the work.

Saturday, January 9, 2010

WIP Ravenwing

I have finally started my RW models for the other half of my dark angels force. I am a little worried about how they are coming along, but I think I am at the phase where I just have to push on, clean up my brush strokes, and get ready for the washes. My plan is to do a few washes of mud and black over the entire model. At the end I am going to take a mud color and air brush it all along the bottoms of the bikes, giving them that covered in grime look. I guess I will just have to wait and see how it goes.

Sunday, January 3, 2010

Finished Tyrgon With Ruined Ultra Marines Rhino


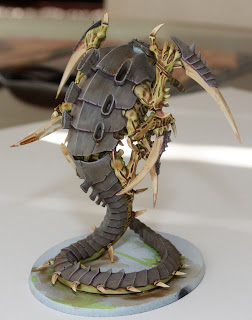
I just finished the Tyrgon! I cleaned up the bone, and made some ruined Ultra Marines rhino parts to add to the base. I think the blue does a lot to bring out the orange, purple and green of the Tyrgon itself. I had loads of fun painting this guy, and hope the store lets be keep the thing once their competition is over. I think the GW Manager has lit a fire beneath me now to paint up some Tyrannids! I especially love painting ruined ultra marines stuff. This army would give me the opportunity to paint all kinds of damaged ultra stuff, but without having to start an Ultra Marines Army.

I think I must dust the base with some forge world powders before I take it to the store. A miniature is never done!

A few hints for this model.

1) do not glue it to the base before the base is painted and done. I got this one glued down, and there were a lot of really difficult places to reach.

2) Paint the base coat and all of the scales before glueing it together! I could have produced a much cleaner model if I did not have to content with the finished piece rather than the individual segments.

3) Buy one! This things is just loads of fun to paint.

trygon Part 3


At this point I have dry brushed the shell with a deheneb stone/purple to pull out the edges and cover the areas of purple wash that sat above the joints. I also re-washed the gryphonne sepia into the areas that were missing it from the first go around, and painted in the little orange tail things. I plan to clean up the bone areas to remove areas where washes pooled. I am not sure if I should dry brush the body with a yellow/green mixture to bring out the details, or just leave is a little spotted from the wash. I would like to get this done by this afternoon so I can return it to the store, but that means I have to skimp on the basing. I've got some rhino hatches that could be weathered and placed in the center of the tail. That would bring some sharp metallic into the mix which would provide a nice contrast...so which chapter should be painted on the the ruined vehicle door? I suppose it should be ultra marines, but I could put a wolves symbol on the base in order to not visually pull away from the green.

Saturday, January 2, 2010

Painting Trygon Part 2


I could not resist laying down a a coat of paint tonight. I will clean up the spots the wash missed i the morning, and then lighten the green area with a yellowish green. Then I base the sucker and get him back to the store!

Trygon Primed!


In a fit of awesomeness, the local GW Tzar offered to let me paint the store model. This thing is absolutely wicked cool. I plan on using the light green method used on my gene stealer for the soft fleshy parts, and some contrasting color for the bone plates. I was thinking of dark brown, with yellow streaks or a muddy purple with yellow streaks. Orange is kind of appealing to me as well. I may try to Iron Man this tonight and tomorrow so I can take it back to the store. It really comes down to how fast washes dry, and how involved the base should be. I received the model built, but, I think I need to sculpt some undulations onto the base, add reeds, maybe an impaled guards man, or perhaps ruined weathered tank bits. I am really looking forward to this!