Monday, February 29, 2016

Wargames Table: Telegraph Poles


One of the neat properties of the Normandy and Market Garden tables is that they can both have terrain pinned on them. I took advantage of this property today with some scratch built telegraph poles. I know they aren't as detailed as they probably should be, but I think they can pass for cement poles reasonably well.  When we use the table the string will probably get annoying, but I think it adds a lot of flavor. All I need to do now is dust the poles up so they look weathered.

Tiny fences are next on the docket. I think using pins to hold them in place is going to really sell the board, since the terrain features will appear attached.

Saturday, February 27, 2016

King Tiger for Bolt Action WIP


Above is a King Tiger exhibition color modulation. The tank is far from complete, but since I haven't shown a good example of color modulation in a while, I figured now was a good time to do it. The combination of the lighting, and the semi-gloss lacquer coat, make it difficult to photograph, but I think the emphasis on the front of the tank can be seen. Once the tank is dull coated it will be much easier to see all of the blends.

So what is left to do?


  • streaking
  • yellow filter (maybe grey)
  • plaster for mud
  • pigments
  • rust
  • oil spills

  • camouflage*


* Yep, I may still paint a camouflage pattern on this tank. I had originally intended to paint it up in tri-color ambush pattern thanks to some great research from Mike Brandt, but I think It would look better at this scale if I just added some green sections. That would also allow me to use the bottle of heavy chipping fluid that just came in the mail. That's the real reason.

It is kind of weird to use this in a game before it is finished, but Mike has a huge game coming up tomorrow involving all of Easy company. You knew those 4 Shermans had to have been painted for a reason right? Apparently that reason is to die one at a time to this guy. (or 1 of the other two Tiger 1s)


Friday, February 26, 2016

Bolt Action Tank Platoon


Our gaming club has a Bolt Action game this weekend, so I had to finally finish these 4 Sherman tanks, which have sat neglected in my gaming cabinet for ages. The platoon managed to get a whole series of overlapping weathering experiments. I think two areas worked out well. I like the oil stains on the rear deck, and I like the light pigment color.  The trick to using oil, was to thin it down significantly with thinner, and then let it form its own tide marks. The pigment just required me to finally give it a shot. In addition to the pigments, there are two colors of oil paint splatter all over the tanks. I am not particularly pleased with the result, but I suspect some will like it. It makes me wonder why I bothered with color modulation when so much of the detail ends up being the result of pigments and oils.

Wednesday, February 24, 2016

Adding Water to the Table


I had a feeling after seeing the leaf texture go on over the grass that the marsh area was going to look really good. The missing ingredient was water. For this table I am using clear resin with a little bit of Secret Weapon Miniatures Green Earth weathering powder. I love that color. I also love the way it tinted the first pour. In 72 hours I should be able to pour a second layer of resin, this time clear, over the murky water. I don't plan on adding a lot, just enough to trick the eyes/brain into perceiving more depth.


The important question now is whether I should add lily pads? I think that would amp the board up even more, but it might not be necessary.

Tuesday, February 23, 2016

Operation Market Garden Table WIP


With a Normany table capable of pulling double duty as an eastern front table minus bocage, I decided the next board needed was a raised highway board. Operation Market Garden, the ill conceived Montgomery debacle, had a large ground force driving deep into holland, while paratroopers attempted to hold key bridges. It failed. It failed badly. It does offer some interesting terrain for battles. To capture the feeling, I decided to construct an area to represent some place south of Arnhem. The railway tracks are the highest point on the board, followed by roads, then fields, then the deep ditches. Muddy water will be added to the ditches along the railway as well as in a few points along the fields. Reeds and tally plants are to follow along standing water, and in the marsh areas. (I even built a tool just for this purpose!) This kind of table benefits from having the terrain built into it. The contours of the board itself provide all of the cover the infantry will get. Tanks will have to stay away from marshes, and wheeled vehicles will have to stay on the roads. Once I add a string of telegraph poles and some scattered trees along the road, this table will be ready for battle. 

Thursday, February 11, 2016

Homemade Static Grass Applicator


My last static grass applicator was made out of an electronic fly swatter. This time around I decided to build it completely from scratch. It should be perfectly clear from my setup, that I am not an electrical engineer, electrician, or any sort of authority on the safety of building such a thing. I just wanted one. So I went online and purchased a negative ion generator(JP-D1221 ~ $10). The one I bought came with two white wires with brushes at the ends. The wiring was pretty simple.


  • Cut off the brushes from the two white wires on the negative ion generator. (the black box in the photo)
  • Connect both of these to a metal screen. In the photos my bases are sitting on the screen. 
  • Add a second wire to the negative pole on the battery. This wire will lead to a second screen, which is attached to an old paint brush. In this photo that assembly is sort of in the middle right of the top photo. This assembly is the shaker. 
  • Place bases covered in PVA on the lower screen
  • Flip switch if you have added one.
  • Add static grass to the applicator-spoon thingy
  • Shake it. Shake it.......

That is it. I had already tried to add a second layer of glue on top of the still drying static grass placed during my first go around. This mucked up the bases a bit, but the concept works in principle.  I think it is time for me to go out and buy some different lengths of static grass.

Tuesday, February 9, 2016

Quick Fix For Camouflage Gone Wrong


I painted these Lehman Russ tanks quite some time ago, and they've sat unloved in the very back of my display cabinet since then. As my first attempt's at Kursk style camouflage on IG vehicles, they came out ok, but not great. With my big press into ww2 modeling, I decided that I needed to figure out how to salvage these old models. On the historical side of things, I've been using a lot of filters to improve the surface texture of my models. Filters are basically really thin oil washes that soften and blend colors together. One technique I have never tried is the traditional military model's goto method of spraying dust colored paint all over the model. Since these tanks were destined to live out their remaining days hidden away in a box, it seemed a good time to give it a shot.

So, one diluted pot of Tamiya XF-57, and ten minutes of work, and this is the result. I think the moral of the story is to keep trying out different techniques regardless of whether they have been superseded by more advanced ones. I like this result. It dulled down the model just enough to blend the green lines into the yellow. I strongly recommend this. (though not if you want to keep your color modulation crisp!)

Next easy steps:

  • practice mud spatter
  • add darker tones to the rust
  • add oil leaks around the sprockets


Sunday, February 7, 2016

Bolt Action Game Using 1/72 Miniatures


Steve, that guy from Cheat'n Steve's, and I had our first 1/72 scale bolt action game last night. We used a few fun custom rules, which I'll leave to him to explain on his blog. The initial game consisted of two roughly evenly platoons. Despite the German forces being dug in and ready for attack, the American forces annihilated the German defenders. A swift and efficient American advance took control of the bridge.

For the second part of the campaign, each side was giving reinforcements. The loss of the bridge would have allowed Allied forces easy access the marsh. With this loss risking other German fronts, I was given a platoon of Stugs supported by an infantry platoon. I choose to bring the stugs on first since my troops lacked transport. The stugs worked amazingly well. They thrust deep into the American lines, using their machine guns to suppress forward deployed troops, and regain control of the bridge. The counter attack was risky, but some very unlucky shots from the sherman tanks meant that the stugs were able to close down both roads to American vehicles. With losses of two tanks, Steve's posture changed to defensive, and he prepared to fight back the advancing German platoon.

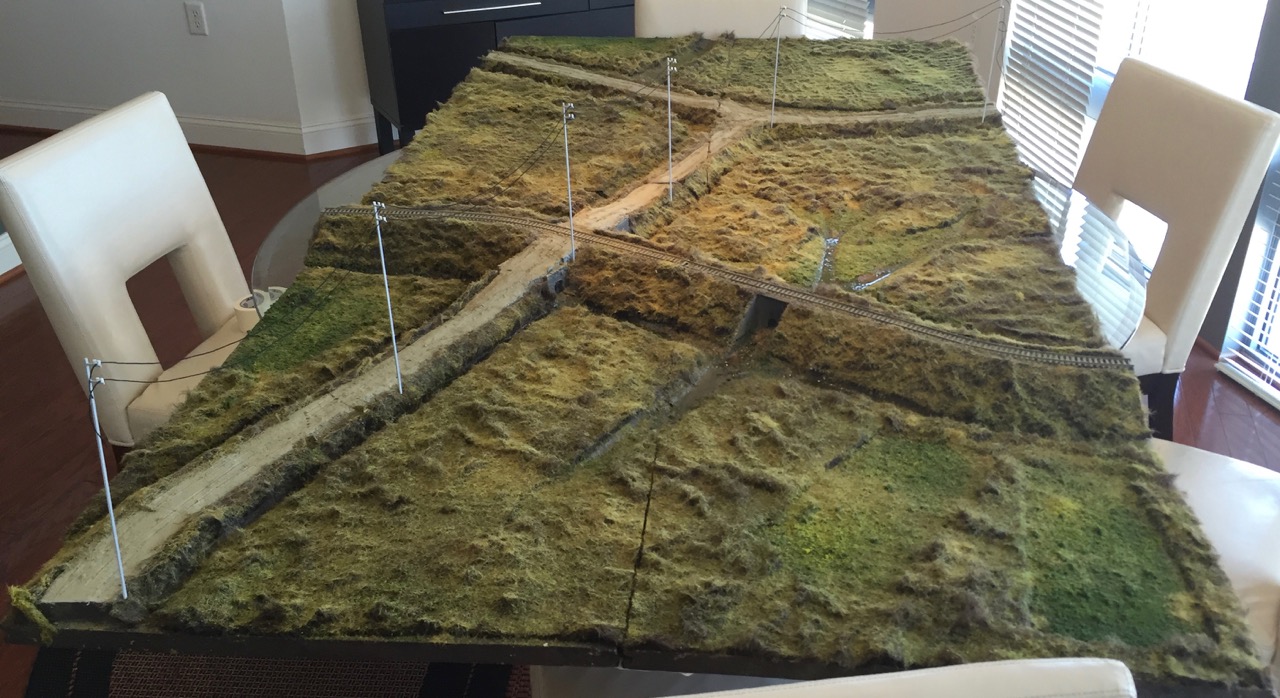
Every part of the game was enjoyable. We used custom rules, we ignored points, and we tried move models in keeping with military doctrine(or john's doctrine which uses medics as scouts). I hope Steve has some photos of his squads advancing to the bridge during the first part of the game. It looked incredibly realistic. I learned a lot from the game.


  • Stugs are great in bocage
  • I need to learn how to maneuver squads in a mutually supporting way
  • I shouldn't fear losing some troops if it means I can redeploy to a better position
  • 1/72 plays wonderful without any modification to Bolt Action


Friday, February 5, 2016

Various WWII

 28mm Tiger and Puma

The table setup for a 28mm game. All of the terrain is scratch built.

 Heroic 28mm on the left, and 1/72 scale on the right. 


I played my first game on the new table last Saturday against Owen's Russian forces. I was committed to using both the Tiger tank and Puma armored car and consequently faced down two T34 tanks and bucket loads of soviet infantry. It was a lot of fun to finally play on the table, and more photos of the battle are coming.

Take a look at the Sherman turret next to that King Tiger turret. I know which one I think wins in a fight. On the bright side, the German tanks were poorly welded due to difficulties in the manufacturing process. This meant that an allied shots that would not normally be able to penetrate the King Tiger's armor could still cause spalling on the interior. Basically the welds came apart and shot through the interior,  damaging the vehicle and potentially killing the crew. We'll see how well this big cat does against a full Sherman platoon in an upcoming game. Even five on one it doesn't seem fair.